云原生
Kubernetes基础
容器技术介绍
Docker快速入门
Containerd快速入门
K8S主要资源罗列
认识YAML
API资源对象
Kubernetes安全掌控
Kubernetes网络
Kubernetes高级调度
Kubernetes 存储
Kubernetes集群维护
Skywalking全链路监控
ConfigMap&Secret场景应用
Kubernetes基础概念及核心组件
水平自动扩容和缩容HPA
Jenkins
k8s中部署jenkins并利用master-slave模式实现CICD
Jenkins构建过程中常见问题排查与解决
Jenkins部署在k8s集群之外使用动态slave模式
Jenkins基于Helm的应用发布
Jenkins Pipeline语法
EFKStack
EFK日志平台部署管理
海量数据下的EFK架构优化升级
基于Loki的日志收集系统
Ingress
基于Kubernetes的Ingress-Nginx解决方案
Ingress-Nginx高级配置
使用 Ingress-Nginx 进行灰度(金丝雀)发布
Ingress-nginx优化配置
APM
Skywalking全链路监控
基于Helm部署Skywalking
应用接入Skywalking
服务网格
Istio
基于Istio的微服务可观察性
基于Istio的微服务Gateway实战
Kubernetes高可用集群部署
Kuberntes部署MetalLB负载均衡器
Ceph
使用cephadm部署ceph集群
使用Rook部署Ceph存储集群
openstack
glance上传镜像失败
mariadb运行不起来
创建域和项目错误_1
创建域和项目错误_2
安装计算节点
时钟源
网络创建失败
本文档使用 MrDoc 发布
-
+
首页
Kubernetes高可用集群部署
# 1、 Kubernetes高可用集群搭建(堆叠etcd模式) 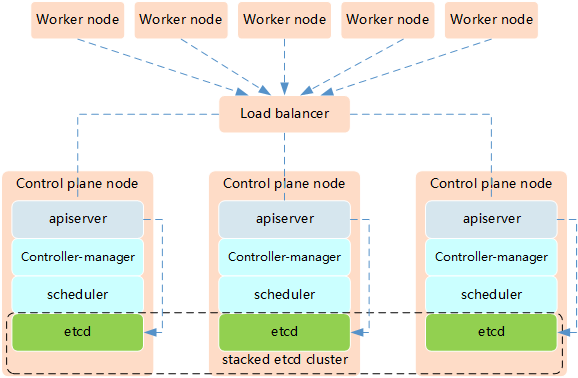 堆叠etcd集群指的是,etcd和Kubernetes其它组件共用一台主机。 高可用思路: - 1)使用keepalived+haproxy实现高可用+负载均衡 - 2)apiserver、Controller-manager、scheduler三台机器分别部署一个节点,共三个节点 - 3)etcd三台机器三个节点实现集群模式 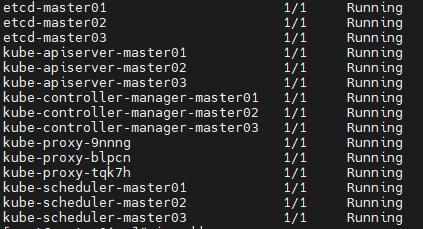 机器准备(操作系统Rocky8.7): | 主机名 | IP | 安装组件 | |----------|------------|--------------------------------------------------------------------------------------------| | master01 | 10.0.1.201 | etcd、apiserver、Controller-manager、scheduller、keepalived、haproxy、kubelet、containerd、kubeadm | | master02 | 10.0.1.202 | etcd、apiserver、Controller-manager、scheduller、keepalived、haproxy、kubelet、containerd、kubeadm | | master03 | 10.0.1.203 | etcd、apiserver、Controller-manager、scheduller、keepalived、haproxy、kubelet、containerd、kubeadm | | node01 | 10.0.1.204 | kubelet、containerd、kubeadm | | node02 | 10.0.1.205 | kubelet、containerd、kubeadm | | node03 | 10.0.1.206 | kubelet、containerd、kubeadm | | -- | 10.0.1.200 | vip | ## 1.1 准备工作 **说明:5台机器都做** ### 关闭防火墙、SELINUX ``` $ systemctl stop firewalld && systemctl disable firewalld $ sed -i 's/enforcing/disabled/g' /etc/selinux/config $ setenforce 0 ``` ### 2 配置主机名 master节点,名称为master01 ``` $ hostnamectl set-hostname master01 ``` node节点,名称为node01 ``` $ hostnamectl set-hostname node01 ``` ### 配置Host文件 ``` $ cat > /etc/hosts <<EOF 10.0.1.201 master01 10.0.1.202 master02 10.0.1.203 master03 10.0.1.204 node01 10.0.1.205 node02 10.0.1.206 node03 EOF ``` ### 关闭SWAP分区 ``` $ swapoff -a # 临时 --有用 $ sed -ri 's/.*swap.*/#&/' /etc/fstab ``` ### 时间同步配置 ``` $ yum install -y chrony $ systemctl start chronyd && systemctl enable chronyd ``` ### 配置内核转发及网桥过滤 ``` $ cat > /etc/modules-load.d/k8s.conf << EOF overlay br_netfilter EOF 添加网桥过滤及内核转发配置文件 $ cat > /etc/sysctl.d/k8s.conf <<EOF net.bridge.bridge-nf-call-ip6tables = 1 net.bridge.bridge-nf-call-iptables = 1 net.ipv4.ip_forward = 1 vm.swappiness = 0 EOF 加载br_netfilter模块 $ modprobe overlay $ modprobe br_netfilter 查看是否加载 $ lsmod | grep br_netfilter br_netfilter 22256 0 bridge 151336 1 br_netfilter 加载网桥过滤及内核转发配置文件 $ sysctl -p /etc/sysctl.d/k8s.conf net.bridge.bridge-nf-call-ip6tables = 1 net.bridge.bridge-nf-call-iptables = 1 net.ipv4.ip_forward = 1 vm.swappiness = 0 ``` ### 安装ipset及ipvsadm 安装ipset及ipvsadm ``` $ dnf install -y ipset ipvsadm ``` 配置ipvsadm模块加载方式,添加需要加载的模块 ``` $ cat > /etc/sysconfig/modules/ipvs.modules <<EOF #!/bin/bash modprobe -- ip_vs modprobe -- ip_vs_rr modprobe -- ip_vs_wrr modprobe -- ip_vs_sh modprobe -- nf_conntrack EOF ``` 授权、运行、检查是否加载 ``` $ chmod 755 /etc/sysconfig/modules/ipvs.modules && bash /etc/sysconfig/modules/ipvs.modules && lsmod | grep -e ip_vs -e nf_conntrack ``` ## 1.2 安装Keepalived + haproxy 1)用yum安装keepalived和haproxy(三台master上) ```Bash $ yum install -y keepalived haproxy ``` 2)配置keepalived \ master01上 \ ```Bash $ vi /etc/keepalived/keepalived.conf #编辑成如下内容 global_defs { router_id lvs-keepalived01 #router_id 机器标识。故障发生时,邮件通知会用到。 } vrrp_script chk_haproxy { script "/etc/keepalived/check_haproxy.sh" interval 5 fall 2 } vrrp_instance VI_1 { #vrrp实例定义部分 state MASTER #设置lvs的状态,MASTER和BACKUP两种,必须大写 interface ens192 #设置对外服务的接口 virtual_router_id 100 #设置虚拟路由标示,这个标示是一个数字,同一个vrrp实例使用唯一标示 priority 100 #定义优先级,数字越大优先级越高,在一个vrrp——instance下,master的优先级必须大于backup advert_int 1 #设定master与backup负载均衡器之间同步检查的时间间隔,单位是秒 authentication { #设置验证类型和密码 auth_type PASS #主要有PASS和AH两种 auth_pass aminglinuX #验证密码,同一个vrrp_instance下MASTER和BACKUP密码必须相同 } virtual_ipaddress { #设置虚拟ip地址,可以设置多个,每行一个 10.0.1.200 } mcast_src_ip 10.0.1.201 #master01的ip track_script { chk_haproxy } } ``` master02上 ```Bash $ vi /etc/keepalived/keepalived.conf #编辑成如下内容 global_defs { router_id lvs-keepalived01 #router_id 机器标识。故障发生时,邮件通知会用到。 } vrrp_script chk_haproxy { script "/etc/keepalived/check_haproxy.sh" interval 5 fall 2 } vrrp_instance VI_1 { #vrrp实例定义部分 state BACKUP #设置lvs的状态,MASTER和BACKUP两种,必须大写 interface ens192 #设置对外服务的接口 virtual_router_id 100 #设置虚拟路由标示,这个标示是一个数字,同一个vrrp实例使用唯一标示 priority 90 #定义优先级,数字越大优先级越高,在一个vrrp——instance下,master的优先级必须大于backup advert_int 1 #设定master与backup负载均衡器之间同步检查的时间间隔,单位是秒 authentication { #设置验证类型和密码 auth_type PASS #主要有PASS和AH两种 auth_pass aminglinuX #验证密码,同一个vrrp_instance下MASTER和BACKUP密码必须相同 } virtual_ipaddress { #设置虚拟ip地址,可以设置多个,每行一个 10.0.1.200 } mcast_src_ip 10.0.1.202 #master02的ip track_script { chk_haproxy } } ``` master03上 ```Bash global_defs { router_id lvs-keepalived01 #router_id 机器标识。故障发生时,邮件通知会用到。 } vrrp_script chk_haproxy { script "/etc/keepalived/check_haproxy.sh" interval 5 fall 2 } vrrp_instance VI_1 { #vrrp实例定义部分 state BACKUP #设置lvs的状态,MASTER和BACKUP两种,必须大写 interface ens192 #设置对外服务的接口 virtual_router_id 100 #设置虚拟路由标示,这个标示是一个数字,同一个vrrp实例使用唯一标示 priority 80 #定义优先级,数字越大优先级越高,在一个vrrp——instance下,master的优先级必须大于backup advert_int 1 #设定master与backup负载均衡器之间同步检查的时间间隔,单位是秒 authentication { #设置验证类型和密码 auth_type PASS #主要有PASS和AH两种 auth_pass aminglinuX #验证密码,同一个vrrp_instance下MASTER和BACKUP密码必须相同 } virtual_ipaddress { #设置虚拟ip地址,可以设置多个,每行一个 10.0.1.200 } mcast_src_ip 10.0.1.203 #master03的ip track_script { chk_haproxy } } ``` 编辑检测脚本(三台master上都执行) ```Bash $ vi /etc/keepalived/check_haproxy.sh #内容如下 #!/bin/bash ha_pid_num=$(ps -ef | grep ^haproxy | wc -l) if [[ ${ha_pid_num} -ne 0 ]];then exit 0 else exit 1 fi ``` 保存后,给执行权限 ```Bash $ chmod a+x /etc/keepalived/check_haproxy.sh ``` 3)配置haproxy(三台master上) ```Bash $ vi /etc/haproxy/haproxy.cfg ##修改为如下内容 global log 127.0.0.1 local2 chroot /var/lib/haproxy pidfile /var/run/haproxy.pid maxconn 4000 user haproxy group haproxy daemon stats socket /var/lib/haproxy/stats ssl-default-bind-ciphers PROFILE=SYSTEM ssl-default-server-ciphers PROFILE=SYSTEM defaults mode http log global option httplog option dontlognull option http-server-close option forwardfor except 127.0.0.0/8 option redispatch retries 3 timeout http-request 10s timeout queue 1m timeout connect 10s timeout client 1m timeout server 1m timeout http-keep-alive 10s timeout check 10s maxconn 3000 frontend k8s bind 0.0.0.0:16443 mode tcp option tcplog tcp-request inspect-delay 5s default_backend k8s backend k8s mode tcp balance roundrobin server master01 10.0.1.201:6443 check server master02 10.0.1.202:6443 check server master03 10.0.1.203:6443 check ``` 4)启动haproxy和keepalived(三台master上执行) ```Bash # 启动haproxy $ systemctl start haproxy; systemctl enable haproxy # 启动keepalived $ systemctl start keepalived; systemctl enable keepalived ``` 5)测试 \ 首先查看ip ```Bash $ ip add | grep 10.0.1.200 #master01上已经自动配置上了10.0.1.200 inet 10.0.1.200/32 scope global ens192 ``` master01上关闭keepalived服务,vip会跑到master02上,再把master02上的keepalived服务关闭,vip会跑到master03上 再把master02和master01服务开启 ## 1.3 安装Containerd(6台机器上都操作) 官方文档:https://github.com/containerd/containerd/blob/main/docs/getting-started.md \ 下载并解压 \ 地址:https://github.com/containerd/containerd/releases ``` # wget https://github.com/containerd/containerd/releases/download/v1.7.6/containerd-1.7.6-linux-amd64.tar.gz # tar xvf containerd-1.7.6-linux-amd64.tar.gz -C /usr/local ``` 配置systemd ``` # wget -O /usr/lib/systemd/system/containerd.service https://raw.githubusercontent.com/containerd/containerd/main/containerd.service # systemctl daemon-reload # systemctl enable --now containerd ``` 配置runc \ 地址: https://github.com/opencontainers/runc/releases ``` $ wget https://github.com/opencontainers/runc/releases/download/v1.1.10/runc.amd64 # install -m 755 runc.amd64 /usr/local/sbin/runc ``` 配置CNI plugins \ 地址:https://github.com/containernetworking/plugins/releases ``` # wget https://github.com/containernetworking/plugins/releases/download/v1.3.0/cni-plugins-linux-amd64-v1.3.0.tgz # mkdir -p /opt/cni/bin # tar xzvf cni-plugins-linux-amd64-v1.3.0.tgz -C /opt/cni/bin ``` 配置cgroup ``` $ mkdir /etc/containerd $ /usr/local/bin/containerd config default > /etc/containerd/config.toml $ sed -i 's/SystemdCgroup = false/SystemdCgroup = true/g' /etc/containerd/config.toml $ sed -i 's/sandbox_image = "registry.k8s.io\/pause:3.8"/sandbox_image = "registry.aliyuncs.com\/google_containers\/pause:3.9"/g' /etc/containerd/config.toml $ systemctl restart containerd ``` ## 1.4 配置kubernetes仓库(6台机器都操作) ``` $ cat <<EOF > /etc/yum.repos.d/kubernetes.repo [kubernetes] name=Kubernetes baseurl=https://mirrors.aliyun.com/kubernetes/yum/repos/kubernetes-el7-x86_64/ enabled=1 gpgcheck=1 repo_gpgcheck=1 gpgkey=https://mirrors.aliyun.com/kubernetes/yum/doc/yum-key.gpg https://mirrors.aliyun.com/kubernetes/yum/doc/rpm-package-key.gpg EOF $ yum makecache ``` 说明:kubernetes用的是RHEL7的源,和8是通用的 ## 1.5 安装kubeadm和kubelet(5台机器都操作) 1)查看所有版本 ```Bash $ yum --showduplicates list kubeadm ``` 2)安装1.27.2版本 ```Bash $ yum install -y kubelet-1.27.2 kubeadm-1.27.2 kubectl-1.27.2 ``` 3)启动kubelet服务 ```Bash $ systemctl start kubelet && systemctl enable kubelet ``` 4)设置crictl连接 containerd(5台机器都操作) ```Bash $ crictl config --set runtime-endpoint=unix:///run/containerd/containerd.sock ``` ## 1.6 用kubeadm初始化(master01上) 参考 https://kubernetes.io/zh-cn/docs/setup/production-environment/tools/kubeadm/high-availability/ ```Bash $ kubeadm init --image-repository=registry.cn-hangzhou.aliyuncs.com/google_containers --kubernetes-version=v1.27.2 --service-cidr=10.15.0.0/16 --pod-network-cidr=10.18.0.0/16 --upload-certs --control-plane-endpoint "10.0.1.200:16443" ``` 输出: ```Bash Your Kubernetes control-plane has initialized successfully! To start using your cluster, you need to run the following as a regular user: mkdir -p $HOME/.kube sudo cp -i /etc/kubernetes/admin.conf $HOME/.kube/config sudo chown $(id -u):$(id -g) $HOME/.kube/config Alternatively, if you are the root user, you can run: export KUBECONFIG=/etc/kubernetes/admin.conf You should now deploy a pod network to the cluster. Run "kubectl apply -f [podnetwork].yaml" with one of the options listed at: https://kubernetes.io/docs/concepts/cluster-administration/addons/ You can now join any number of the control-plane node running the following command on each as root: kubeadm join 10.0.1.200:16443 --token h0wvx7.d2evlqevjfd56sp3 \ --discovery-token-ca-cert-hash sha256:309f4fee83b92ee0ed16d9bd9de5ff0db3f651ca26aad63fcf470c8c924c9c63 \ --control-plane --certificate-key 1a8a89af3c7844e612d23aa74bc8638d45d4cd501b99ee26f0fd5145cfeec65c Please note that the certificate-key gives access to cluster sensitive data, keep it secret! As a safeguard, uploaded-certs will be deleted in two hours; If necessary, you can use "kubeadm init phase upload-certs --upload-certs" to reload certs afterward. Then you can join any number of worker nodes by running the following on each as root: kubeadm join 10.0.1.200:16443 --token h0wvx7.d2evlqevjfd56sp3 \ --discovery-token-ca-cert-hash sha256:309f4fee83b92ee0ed16d9bd9de5ff0db3f651ca26aad63fcf470c8c924c9c63 ``` 拷贝kubeconfig配置,目的是可以使用kubectl命令访问k8s集群 ```Bash $ mkdir -p $HOME/.kube $ cp -i /etc/kubernetes/admin.conf $HOME/.kube/config $ chown $(id -u):$(id -g) $HOME/.kube/config ``` 7)将两个master加入集群 \ master02和master03上执行: \ 说明:以下join命令是将master加入集群 ```Bash $ kubeadm join 10.0.1.200:16443 --token h0wvx7.d2evlqevjfd56sp3 \ --discovery-token-ca-cert-hash sha256:309f4fee83b92ee0ed16d9bd9de5ff0db3f651ca26aad63fcf470c8c924c9c63 \ --control-plane --certificate-key 1a8a89af3c7844e612d23aa74bc8638d45d4cd501b99ee26f0fd5145cfeec65c ``` 该token有效期为24小时,如果过期,需要重新获取token,方法如下: ```Bash $ kubeadm token create --print-join-command --certificate-key 57bce3cb5a574f50350f17fa533095443fb1ff2df480b9fcd42f6203cc014e6b ``` 拷贝kubeconfig配置,目的是可以使用kubectl命令访问k8s集群 ```Bash $ mkdir -p $HOME/.kube $ cp -i /etc/kubernetes/admin.conf $HOME/.kube/config $ chown $(id -u):$(id -g) $HOME/.kube/config ``` 8)修改配置文件 \ master01上: ```Bash vi /etc/kubernetes/manifests/etcd.yaml 将--initial-cluster=master01=https://192.168.222.101:2380 改为 --initial-cluster=master01=https://192.168.222.101:2380,master02=https://192.168.222.102:2380,master03=https://192.168.222.103:2380 ``` master02上: ```Bash $ vi /etc/kubernetes/manifests/etcd.yaml 将--initial-cluster=master01=https://192.168.222.101:2380,master02=https://192.168.222.102:2380改为 --initial-cluster=master01=https://10.0.1.201:2380,master02=https://10.0.1.202:2380,master03=https://10.0.1.203:2380 ``` master03不用修改 9)将两个node加入集群 \ node01和node02上执行 \ 说明:以下join命令是将node加入集群 ```Bash $ kubeadm join 10.0.1.200:16443 --token h0wvx7.d2evlqevjfd56sp3 \ --discovery-token-ca-cert-hash sha256:309f4fee83b92ee0ed16d9bd9de5ff0db3f651ca26aad63fcf470c8c924c9c63 ``` 该token有效期为24小时,如果过期,需要重新获取token,方法如下: ```Bash $ kubeadm token create --print-join-command ``` 查看node状态(master01上执行) ```Bash $ kubectl get node NAME STATUS ROLES AGE VERSION master01 NotReady control-plane 7m50s v1.27.2 master02 NotReady control-plane 4m48s v1.27.2 master03 NotReady control-plane 3m41s v1.27.2 node01 NotReady <none> 15s v1.27.2 node02 NotReady <none> 15s v1.27.2 node03 NotReady <none> 5s v1.27.2 ``` ## 1.7 安装calico网络插件(master01上) 官方文档:https://docs.tigera.io/calico/latest/operations/calicoctl/install * 应用资源清单文件 ``` $ kubectl create -f https://raw.githubusercontent.com/projectcalico/calico/v3.26.1/manifests/tigera-operator.yaml ``` * 准备应应用必要资源配置文件 ``` $ mkdir calicodir && cd calicodir $ wget https://raw.githubusercontent.com/projectcalico/calico/v3.26.1/manifests/custom-resources.yaml 修改 cidr地址 修改文件第13行,修改为使用kubeadm init ----pod-network-cidr对应的IP地址段 - blockSize: 26 cidr: 10.18.0.0/16 encapsulation: VXLANCrossSubnet natOutgoing: Enabled nodeSelector: all() $ kubectl create -f custom-resources.yaml ``` * 确认所有pod运行正常 ``` $ kubectl get pods -n calico-system NAME READY STATUS RESTARTS AGE calico-kube-controllers-844cc8c64b-lpdmx 1/1 Running 0 2m49s calico-node-d4czr 1/1 Running 0 2m50s calico-node-f57w5 1/1 Running 0 2m50s calico-node-f8qs8 1/1 Running 0 2m50s calico-node-hl5kh 1/1 Running 0 2m50s calico-node-v4hbt 1/1 Running 0 2m50s calico-node-vf8dd 1/1 Running 0 2m50s calico-typha-fb74c986c-4mpm8 1/1 Running 0 2m50s calico-typha-fb74c986c-8t4lz 1/1 Running 0 2m41s calico-typha-fb74c986c-xm9nd 1/1 Running 0 2m41s csi-node-driver-5bqrk 2/2 Running 0 2m49s csi-node-driver-9qjgk 2/2 Running 0 2m49s csi-node-driver-g24br 2/2 Running 0 2m49s csi-node-driver-l2vn9 2/2 Running 0 2m49s csi-node-driver-qv4jn 2/2 Running 0 2m49s csi-node-driver-xthk6 2/2 Running 0 2m49s ``` > 等待每个pod状态为running {.is-info} * 删除控制平面上的污点 ``` $ kubectl taint nodes --all node-role.kubernetes.io/control-plane- $ kubectl taint nodes --all node-role.kubernetes.io/master- ``` * calico客户端安装 ``` $ curl -L https://github.com/projectcalico/calico/releases/download/v3.26.1/calicoctl-linux-amd64 -o calicoctl $ chmod +x ./calicoctl $ mv calicoctl /usr/bin/ ``` * 查看已运行节点 ``` $ calicoctl get nodes --allow-version-mismatch NAME master01 master02 master03 node01 node02 node03 ``` 验证集群可用性 ``` [root@master01 package]# kubectl get node NAME STATUS ROLES AGE VERSION master01 Ready control-plane 15m v1.27.2 master02 Ready control-plane 12m v1.27.2 master03 Ready control-plane 11m v1.27.2 node01 Ready <none> 7m48s v1.27.2 node02 Ready <none> 7m48s v1.27.2 node03 Ready <none> 7m38s v1.27.2 ``` ## 1.8 在K8s里快速部署一个应用 1)创建deployment ```Bash $ kubectl create deployment testdp --image=nginx:1.23.2 ##deploymnet名字为testdp 镜像为nginx:1.23.2 ``` 2)查看deployment ```Bash $ kubectl get deployment NAME READY UP-TO-DATE AVAILABLE AGE testdp 1/1 1 1 49s ``` 3)查看pod ```Bash $ kubectl get pods NAME READY STATUS RESTARTS AGE testdp-56d58697dc-rmpr4 1/1 Running 0 61s ``` 4)查看pod详情 ```Bash $ kubectl describe pod testdp-56d58697dc-rmpr4 ``` 5)创建service,暴漏pod端口到node节点上 ```Bash $ kubectl expose deployment testdp --port=80 --type=NodePort --target-port=80 --name=testsvc ``` 6)查看service ```Bash $ kubectl get svc NAME TYPE CLUSTER-IP EXTERNAL-IP PORT(S) AGE testsvc NodePort 10.15.101.71 <none> 80:32183/TCP 4s ``` 可以看到暴漏端口为一个大于30000的随机端口,浏览器里访问 10.0.1.201:32183 
阿星
2024年1月6日 21:23
转发文档
收藏文档
上一篇
下一篇
手机扫码
复制链接
手机扫一扫转发分享
复制链接
📢 网站已迁移:
本站内容已迁移至新地址:
zhoumx.net
。
注意:
本网站将不再更新,请尽快访问新站点。
Markdown文件
PDF文档(打印)
分享
链接
类型
密码
更新密码