Python
拼接字符串的7种方法
编码规范
随机字符生成
Python办公自动化之word
本文档使用 MrDoc 发布
-
+
首页
Python办公自动化之word
# 1、Python-docx ## 1.1、简介 是Python的第三方模块,用于自动化生成或修改word文档,写入文本、图片、表格等常用办公必备功能。 官方文档地址:https://python-docx.readthedocs.io/en/latest/ ## 1.2、安装命令 ``` pip install python-docx ``` ## 1.3、使用方法 * 写入文本到word(符号“#”表示注释) ``` from docx import Document # 1、创建一个文档对象 document0 = Document() # 读取现有的Word文档对象 # document1 = Document("xxx.docx") # 2、写入内容 # 2.1、写入标题,后面的数字表示标题等级 head = document0.add_heading("江城子·密州出猎", 2) # 2.2、写入段落 p1 = document0.add_paragraph("老夫聊发少年狂,左牵黄,右擎苍,锦帽貂裘,千骑卷平冈。") # 2.3、在p1前插入作者 author = p1.insert_paragraph_before("—— 宋·苏轼") # 2.4、在p1后追加 run1 = p1.add_run("为报倾城随太守,") run2 = p1.add_run("亲射虎,看孙郎。") p2 = document0.add_paragraph("酒酣胸胆尚开张,鬓微霜,又何妨!持节云中,何日遣冯唐?会挽雕弓如满月,西北望,射天狼。") # 3、保存文件 document0.save("密州出猎.docx") ``` 效果如下: 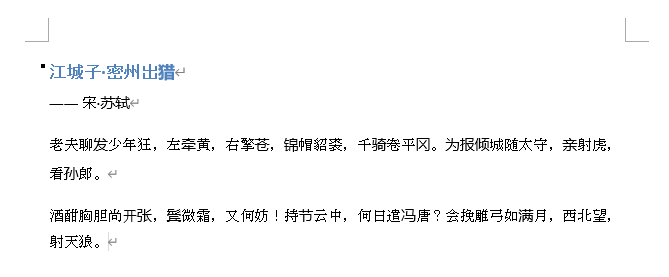 * 写入图片 ``` # 3、写入图片 # document0.add_picture("D:\Study\Python\img1.jpeg") # 设置图片大小(宽、高) document0.add_picture("D:\Study\Python\img1.jpeg", Pt(300), Pt(200)) ``` 效果如下: 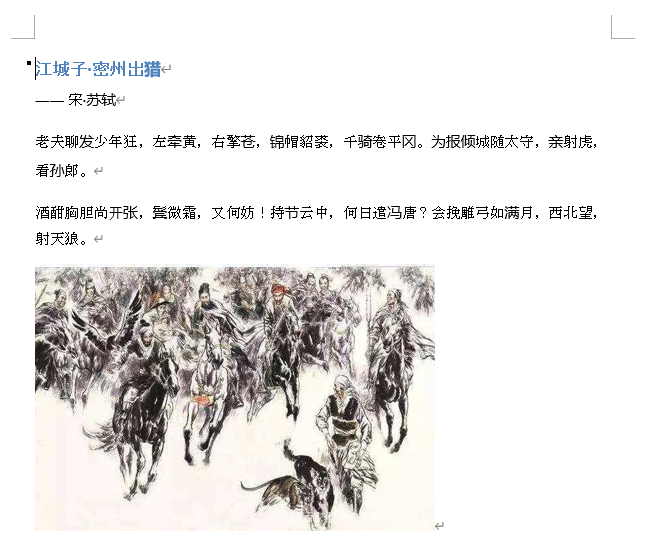 * 写入表格 ``` # 4、写入表格(rows:行、cols:列) # style:Table Grid表示给表格加上边框 table = document0.add_table(rows=1, cols=3, style='Table Grid') # 拿到第一行的所有单元格对象 header_cells = table.rows[0].cells header_cells[0].text = "诗词名称" header_cells[1].text = "朝代" header_cells[2].text = "作者" # 元组+列表存放数据 body_date = ( ["江城子·密州出猎", "宋朝", "苏轼"], ["将进酒", "唐朝", "李白"], ["蜀道难", "唐朝", "李白"] ) # 遍历并写入表格 for item in body_date: row_cells = table.add_row().cells # .cells是获取当前这一行的单元格对象 row_cells[0].text = item[0] row_cells[1].text = item[1] row_cells[2].text = item[2] ``` 效果如下: 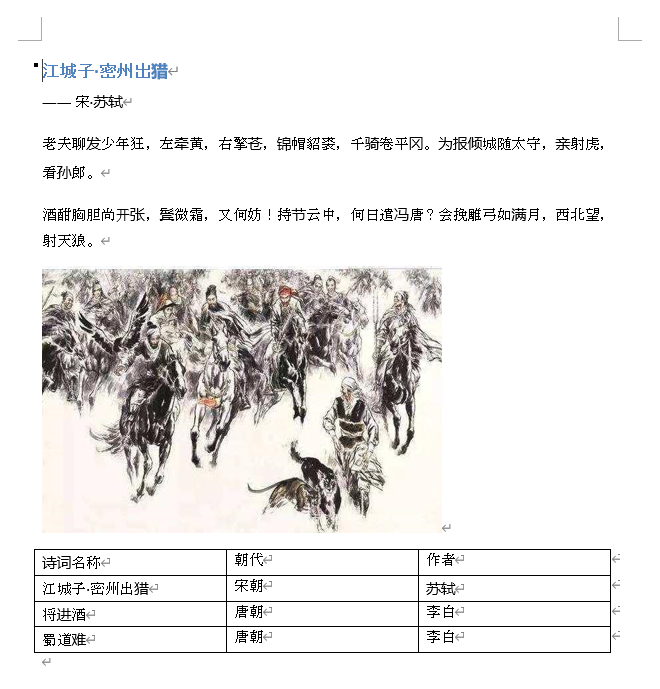 * 写入word样式 ``` from docx import Document from docx.enum.style import WD_STYLE_TYPE from docx.enum.text import WD_PARAGRAPH_ALIGNMENT from docx.oxml.ns import qn from docx.shared import Pt, RGBColor # 1、创建一个文档对象 document0 = Document() # 读取现有的Word文档对象 # document1 = Document("xxx.docx") # 正文部分,字体的全局样式 document0.styles["Normal"].font.name = "仿宋" # 只设置这里不够 document0.styles["Normal"]._element.rPr.rFonts.set(qn("w:eastAsia"), "仿宋") # 还需要添加._element.rPr.rFonts.set方法 document0.styles["Normal"].font.size = Pt(14) # 自定义样式 my_style = document0.styles.add_style("textStyle", WD_STYLE_TYPE.PARAGRAPH) my_style.font.name = "楷体" my_style._element.rPr.rFonts.set(qn("w:eastAsia"), "楷体") my_style.font.size = Pt(12) # 2、写入内容 # 层级关系:document --> paragraph --> run1、run2...... # 2.1、写入标题,后面的数字表示标题等级 head = document0.add_heading("", 2) # 获取样式 head_format = head.paragraph_format # 设置居中对齐 head_format.alignment = WD_PARAGRAPH_ALIGNMENT.CENTER head_run = head.add_run("江城子·密州出猎") head_run.font.name = "仿宋" head_run._element.rPr.rFonts.set(qn("w:eastAsia"), "仿宋") head_run.font.size = Pt(18) head_run.font.color.rgb = RGBColor(0, 0, 0) # 2.2、写入段落 p1 = document0.add_paragraph("老夫聊发少年狂,左牵黄右擎苍,锦帽貂裘,千骑卷平冈。") p1_format = p1.paragraph_format # 左右缩进 p1_format.left_indent = Pt(20) p1_format.right_indent = Pt(20) # 首行缩进 p1_format.first_line_indent = Pt(20) # 行间距 p1_format.line_spacing = 1.5 # 2.3、在p1前插入作者 author = p1.insert_paragraph_before("—— 宋·苏轼", style="textStyle") author_format = author.paragraph_format # 设置作者居中 author_format.alignment = WD_PARAGRAPH_ALIGNMENT.CENTER # 2.4、在p1后追加 run1 = p1.add_run("为报倾城随太守,") # 设置run1的字体大小和颜色 run1.font.size = Pt(14) run1.font.color.rgb = RGBColor(233, 23, 24) run2 = p1.add_run("亲射虎,看孙郎。") # 字体加粗 run2.bold = True # 下划线 run2.font.underline = True # 斜体 run2.font.italic = True p2 = document0.add_paragraph("酒酣胸胆尚开张,鬓微霜,又何妨!持节云中,何日遣冯唐?会挽雕弓如满月,西北望,射天狼。") p2_format = p2.paragraph_format # 首行缩进 p2_format.first_line_indent = Pt(20) # 3、写入图片 # document0.add_picture("D:\Study\Python\img1.jpeg") # 设置图片大小(宽、高) document0.add_picture("D:\Study\Python\img1.jpeg", Pt(300), Pt(200)) # 图片居中 # 不知道位于文档的第几个样式时可以使用print(document0.paragraphs[X].text)查看,X是下表,从0开始 document0.paragraphs[4].alignment = WD_PARAGRAPH_ALIGNMENT.CENTER # 4、写入表格(rows:行、cols:列) table = document0.add_table(rows=1, cols=3, style='Table Grid') # 拿到第一行的所有单元格对象 header_cells = table.rows[0].cells header_cells[0].text = "诗词名称" header_cells[1].text = "朝代" header_cells[2].text = "作者" # 元组+列表存放数据 body_date = ( ["江城子·密州出猎", "宋朝", "苏轼"], ["将进酒", "唐朝", "李白"], ["蜀道难", "唐朝", "李白"] ) # 遍历并写入表格 for item in body_date: row_cells = table.add_row().cells # .cells是获取当前这一行的单元格对象 row_cells[0].text = item[0] row_cells[1].text = item[1] row_cells[2].text = item[2] # 3、保存文件 document0.save("密州出猎.docx") ``` 效果如下: 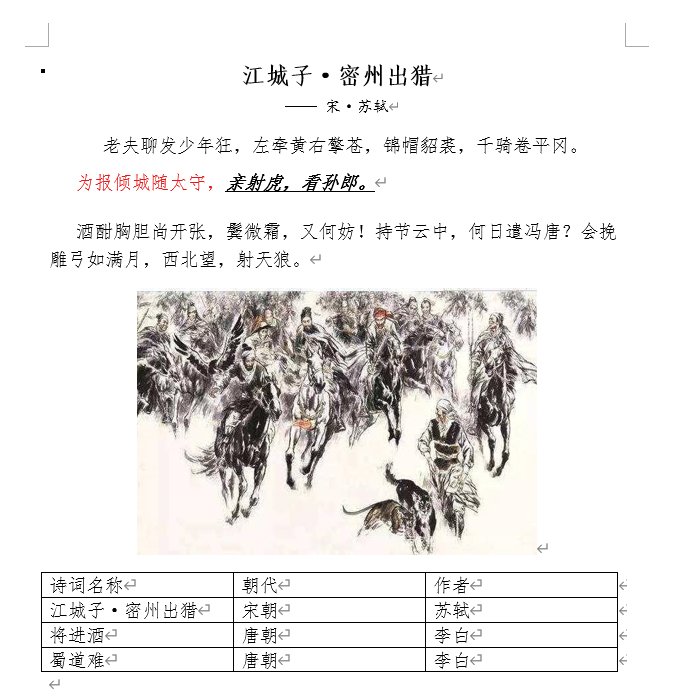 字号对应磅值(pt)关系: 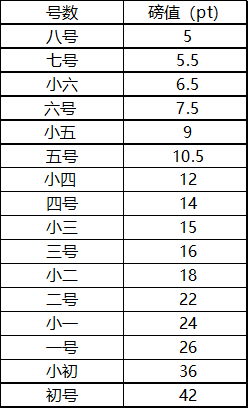 # 2、pywin32 ## 2.1、简介 pywin32是Python的一个代码库,包装了Windows系统的Win32 API,能创建和使用COM对象和图形窗口界面。如果你想用Python操控Windows系统,创建窗口、接受键鼠命令,或用到Win32 API,就需要它。 ## 2.2、安装命令 ``` pip install pywin32 ``` ## 2.3、使用方法 * word转换PDF ``` import os.path from win32com.client import constants, gencache def creat_pdf(word_path, pdf_path): """ 生成PDF文件 :param word_path: word文件路径 :param pdf_path: 生成PDF文件后的保存路径 :return: """ word = gencache.EnsureDispatch("Word.Application") doc = word.Documents.Open(word_path, ReadOnly=1) doc.ExportAsFixedFormat(pdf_path, constants.wdExportFormatPDF) word.Quit() # 获取代码文件当前路径 base_path = os.path.dirname(os.path.abspath(__file__)) # 单个文件转换(路径要写绝对路径) # creat_pdf(os.path.join(base_path, "密州出猎.docx"), os.path.join(base_path, "密州出猎.pdf")) # 多个文件转换 word_files = [] # 遍历当前目录下所有文件 for f in os.listdir("."): if f.endswith((".doc", ".docx")): word_files.append(f) for i in word_files: # 获取文件的绝对路径 word_path = os.path.abspath(i) # 获取最右边"."的下表索引 index = word_path.rindex(".") # 通过字符串切片获取文件后缀之前的元素,加上PDF文件后缀 pdf_path = word_path[:index] + ".pdf" # 调用转换函数 creat_pdf(word_path, pdf_path) ``` 效果如下:  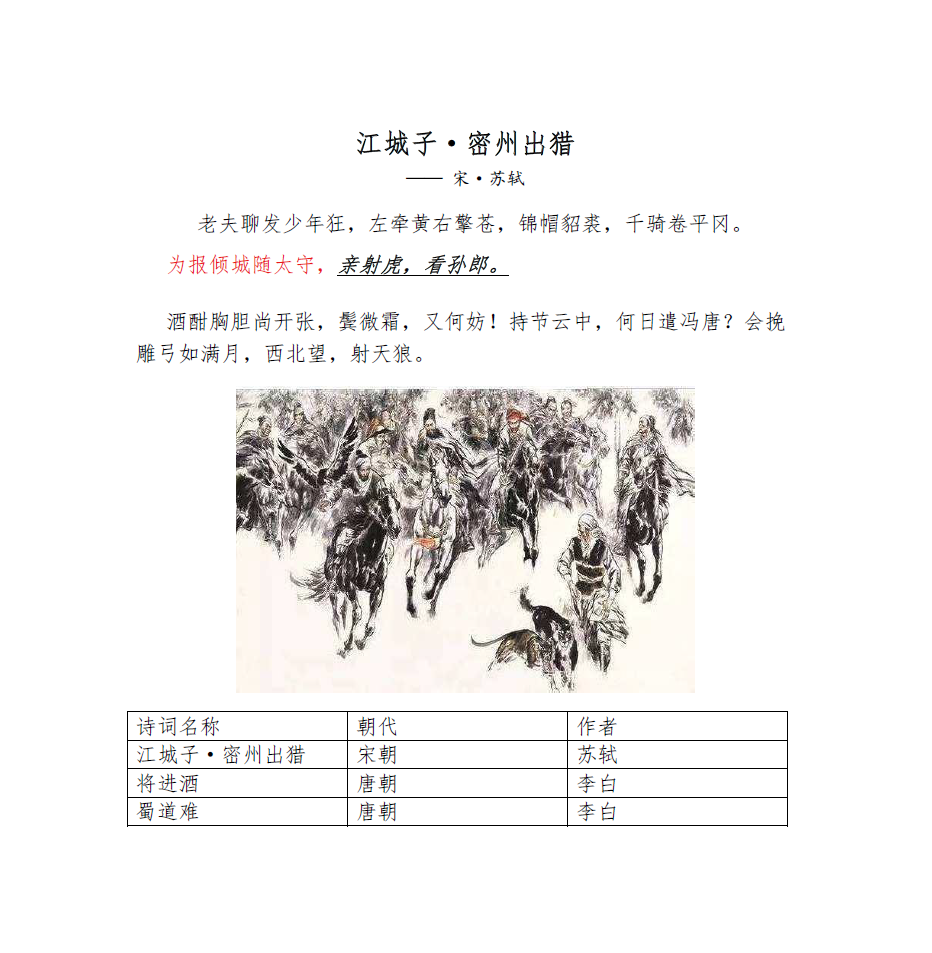
阿星
2024年1月6日 18:28
转发文档
收藏文档
上一篇
下一篇
手机扫码
复制链接
手机扫一扫转发分享
复制链接
📢 网站已迁移:
本站内容已迁移至新地址:
zhoumx.net
。
注意:
本网站将不再更新,请尽快访问新站点。
Markdown文件
PDF文档(打印)
分享
链接
类型
密码
更新密码