Ops工具
Helm
Helm 包管理工具
Helm进阶
Ansible
Ansible入门
Ansible 常用模块指令
Ansible playbook详解
Vdbench
vdbench基础使用指南
vdbench在ARM服务器上出现共享库aarch64.so问题
GitLab
Gitlab自定义机器人
Gitlab安装和使用
CosBench
Cosbench测试
s3curl
s3curl常用命令大全
S3curl测试
FIO
FIO安装和使用方法
本文档使用 MrDoc 发布
-
+
首页
Helm 包管理工具
# 1、Helm工具介绍 ## 1.1 了解Helm Helm是kubernetes中查找、分享、构建应用的最佳方式。 Helm是一个Kubernetes应用的包管理工具,用来管理chart(一种预先配置好的安装包资源),有点类似于Ubuntu 的APT和CentOS/Rocky中的YUM。因此,helm的出现解决了k8s应用管理能力缺失的问题。 另外Helm也是dev和ops的桥梁,运维人员在使用Helm的时候,一方面不需要理解大量在Chart中的各种k8s元素,只需要配置少量的环境变量即可安装;另一方面,Helm也给初级运维人员提供了学习的机会,他们可以在Chart中学习并理解各种K8s元素,从而能够更快的掌握K8s。 官网地址: https://helm.sh/ github地址:https://github.com/helm/helm/releases ## 1.2 Helm核心概念 - ① Chart:Chart就是helm package,包含了一个k8s app应用运行起来的所有要素,比如service, deployment, configmap, serviceaccount, rbac, 等,这些要素都是以template文件的形式存在,再结合values文件,最终渲染出能够被k8s执行的yaml文件。 - ② Repository:仓库是charts的集合,方便进行分享和分发。我们可以将这个仓库添加到本地,然后从这些仓库里查找chart,并使用。 - ③ Hub:不同的个人和组织提供的公共仓库(Repository)形成了分散和分布的Helm仓库,不利于查找,所以官方提供了Helm Hub,各公共仓库可以注册到Helm Hub中以方便集中查找,Helm Hub只是分布的仓库的集中展示中心。 仓库注册到Helm Hub时,会将Chart清单文件向Helm Hub同步一份,这样可以在Helm Hub集中展示仓库列表和各仓库中的Chart列表。 Chart包也就是tgz文件实际上存储在各仓库中。Helm Hub并不实际存储Chart包。Helm只是在查询Chart时和Helm Hub有交互,其它操作都是和仓库直接交互的。 - ④ Release:Release是Helm Chart在kubernetes的一个运行实例,这个release名字会体现在K8s里,其中service和deploy的名字跟这个release名字一致。 ## 1.3 Helm版本和Kubernetes版本要求 参考:https://helm.sh/zh/docs/topics/version_skew/ | Helm 版本 | 支持的 Kubernetes 版本 | | --------- | ---------------------- | | 3.12.x | 1.27.x - 1.24.x | | 3.11.x | 1.26.x - 1.23.x | | 3.10.x | 1.25.x - 1.22.x | | 3.9.x | 1.24.x - 1.21.x | | 3.8.x | 1.23.x - 1.20.x | | 3.7.x | 1.22.x - 1.19.x | | 3.6.x | 1.21.x - 1.18.x | | 3.5.x | 1.20.x - 1.17.x | | 3.4.x | 1.19.x - 1.16.x | | 3.3.x | 1.18.x - 1.15.x | | 3.2.x | 1.18.x - 1.15.x | | 3.1.x | 1.17.x - 1.14.x | | 3.0.x | 1.16.x - 1.13.x | | 2.16.x | 1.16.x - 1.15.x | | 2.15.x | 1.15.x - 1.14.x | | 2.14.x | 1.14.x - 1.13.x | | 2.13.x | 1.13.x - 1.12.x | | 2.12.x | 1.12.x - 1.11.x | | 2.11.x | 1.11.x - 1.10.x | | 2.10.x | 1.10.x - 1.9.x | | 2.9.x | 1.10.x - 1.9.x | | 2.8.x | 1.9.x - 1.8.x | | 2.7.x | 1.8.x - 1.7.x | | 2.6.x | 1.7.x - 1.6.x | | 2.5.x | 1.6.x - 1.5.x | | 2.4.x | 1.6.x - 1.5.x | | 2.3.x | 1.5.x - 1.4.x | | 2.2.x | 1.5.x - 1.4.x | | 2.1.x | 1.5.x - 1.4.x | | 2.0.x | 1.4.x - 1.3.x | # 2、Helm工具常见用法 ## 2.1 安装Helm 说明:我用的Kubernetes版本为1.26.9,考虑到后期会升级Kubernetes版本,所以helm版本为3.12 ``` $ kubectl get no NNAME STATUS ROLES AGE VERSION master01 Ready control-plane 25d v1.26.9 master02 Ready control-plane 25d v1.26.9 master03 Ready control-plane 25d v1.26.9 node01 Ready worker 25d v1.26.9 node02 Ready worker 25d v1.26.9 node03 Ready worker 25d v1.26.9 ``` 下载二进制包 ``` $ wget https://get.helm.sh/helm-v3.12.3-linux-amd64.tar.gz ``` 解压,改名并做软链接 ``` $ tar zxf helm-v3.12.3-linux-amd64.tar.gz -C /opt/ $ mv /opt/linux-amd64/ /opt/helm $ ln -s /opt/helm/helm /bin/ ``` 验证软链接 ``` $ ll /bin/helm lrwxrwxrwx 1 root root 14 Oct 5 22:00 /bin/helm -> /opt/helm/helm ``` 测试,查看helm版本 ``` $ helm version version.BuildInfo{Version:"v3.12.3", GitCommit:"323249351482b3bbfc9f5004f65d400aa70f9ae7", GitTreeState:"clean", GoVersion:"go1.20.3"} ``` ## 2.2 Helm常用命令 添加仓库,这样会把该仓库添加到本地 ``` $ helm repo add bitnami https://charts.bitnami.com/bitnami $ helm repo add helm_sh https://charts.helm.sh/stable $ helm repo add aliyun https://kubernetes.oss-cn-hangzhou.aliyuncs.com/charts ``` 更新仓库列表到本地 ``` $ helm repo update ``` 查看仓库列表 ``` $ helm repo list ``` 在本地添加的仓库里搜索所有chart ``` $ helm search repo ``` 在本地的仓库里搜索mysql ``` $ helm search repo mysql ``` 还可以从公共的hub里搜索chart,目的是找到合适的repo ``` $ helm search hub mysql $ helm search hub mysql --list-repo-url ##查看对应repo的url $ helm search hub mysql --max-col-width 100 #可以设置每一列的宽度,这样可以显示所有的描述信息 ``` 查看某个chart详细信息 ``` $ helm show chart bitnami/mysql ``` 查看某个chart values(这个values相当于是该cahrt的配置文件) ``` $ helm show values helm_sh/redis ``` 安装chart (示例,安装nginx) ``` $ helm search repo nginx ##先搜一下 $ helm install nginx-test bitnami/nginx #这个nginx-test就是release名字,同时也是service和deployment/statefulset以及pod前缀 $ helm install bitnami/nginx --generate-name #让Helm帮忙定义release name,不常用 #其中install过程中会自动生成缓存目录: ~/.cache/helm/repository/ ``` 安装完后,查看用helm安装过的chart ``` $ helm list -A #-A会列出所有namespace里的release,不加-A只列default namespace里的release ``` 卸载 ``` $ helm uninstall nginx-test ``` 下载一个chart包 ``` $ helm pull bitnami/mysql #会下载一个tgz的压缩包 ``` 下载一个指定版本的chart包 ``` $ helm pull bitnami/redis-cluster --version 7.5.0 ``` 利用本地的chart包,直接安装 ``` $ tar zxf mysql-9.12.3.tgz $ cd mysql $ helm install test-mysql . #.代表找当前目录下的values.yaml文件 ``` # 3、Helm工具实践 ## 3.1 安装redis-cluster(三主三从) **环境介绍** | 软件 | 版本 | | ------------- | ------- | | Helm | v3.12.3 | | k8s | v1.26.9 | | redis-cluster | v7.2.2 | | Chat | v9.0.13 | **搭建NFS** 1、先搭建一个NFS的SC(只需要SC,不需要pvc),额外开一台虚拟机,搭建NFS服务。假设NFS服务器IP地址为192.168.1.34,共享目录为/data/nfs 2、每台机器安装NFS客户端 ``` $ yum install nfs-utils -y ``` 3、在k8s-node01(192.168.1.34)启动nfs ``` [root@k8s-node01 ~]# systemctl start nfs-server ``` 4、在k8s-node01(192.168.1.34)查看nfs支持的版本 ``` [root@k8s-node01 ~]# cat /proc/fs/nfsd/versions -2 +3 +4 +4.1 +4.2 ``` 5、在k8s-node01(192.168.1.34)上创建一个共享目录 ``` [root@k8s-node01 ~]# mkdir -p /data/nfs ``` 6、在k8s-node01(192.168.134)编辑授权文件,这里网段根据自己主机来定,我这里网段是192.168.1.0/24 ``` [root@k8s-node01 ~]# vim /etc/exports /data/nfs/ 192.168.1.0/24(rw,sync,no_subtree_check,no_root_squash) ``` 7、在k8s-node01(192.168.1.34)配置生效 ``` [root@k8s-node01 ~]# exportfs -r ``` 8、在k8s-node01(192.168.1.34)重新加载NFS ``` [root@k8s-node01 ~]# systemctl reload nfs-server ``` **创建SC** 1、参考8.4 API资源对象StorageClass章节进行SC创建 ``` $ kubectl get sc NAME PROVISIONER RECLAIMPOLICY VOLUMEBINDINGMODE ALLOWVOLUMEEXPANSION AGE nfs-client k8s-sigs.io/nfs-subdir-external-provisioner Delete Immediate false 3m34s ``` **安装redis-cluster** 1、下载redis-cluster的chart包,直接下载目录 ``` $ helm pull bitnami/redis-cluster --untar ``` 2、修改values.yaml,定义sc和密码 ``` $ cd redis-cluster/ $ vi values.yaml ... ... 22 storageClass: "nfs-client" # 改为你自己的sc名称 23 redis: 24 password: "admin123" ... ... ``` 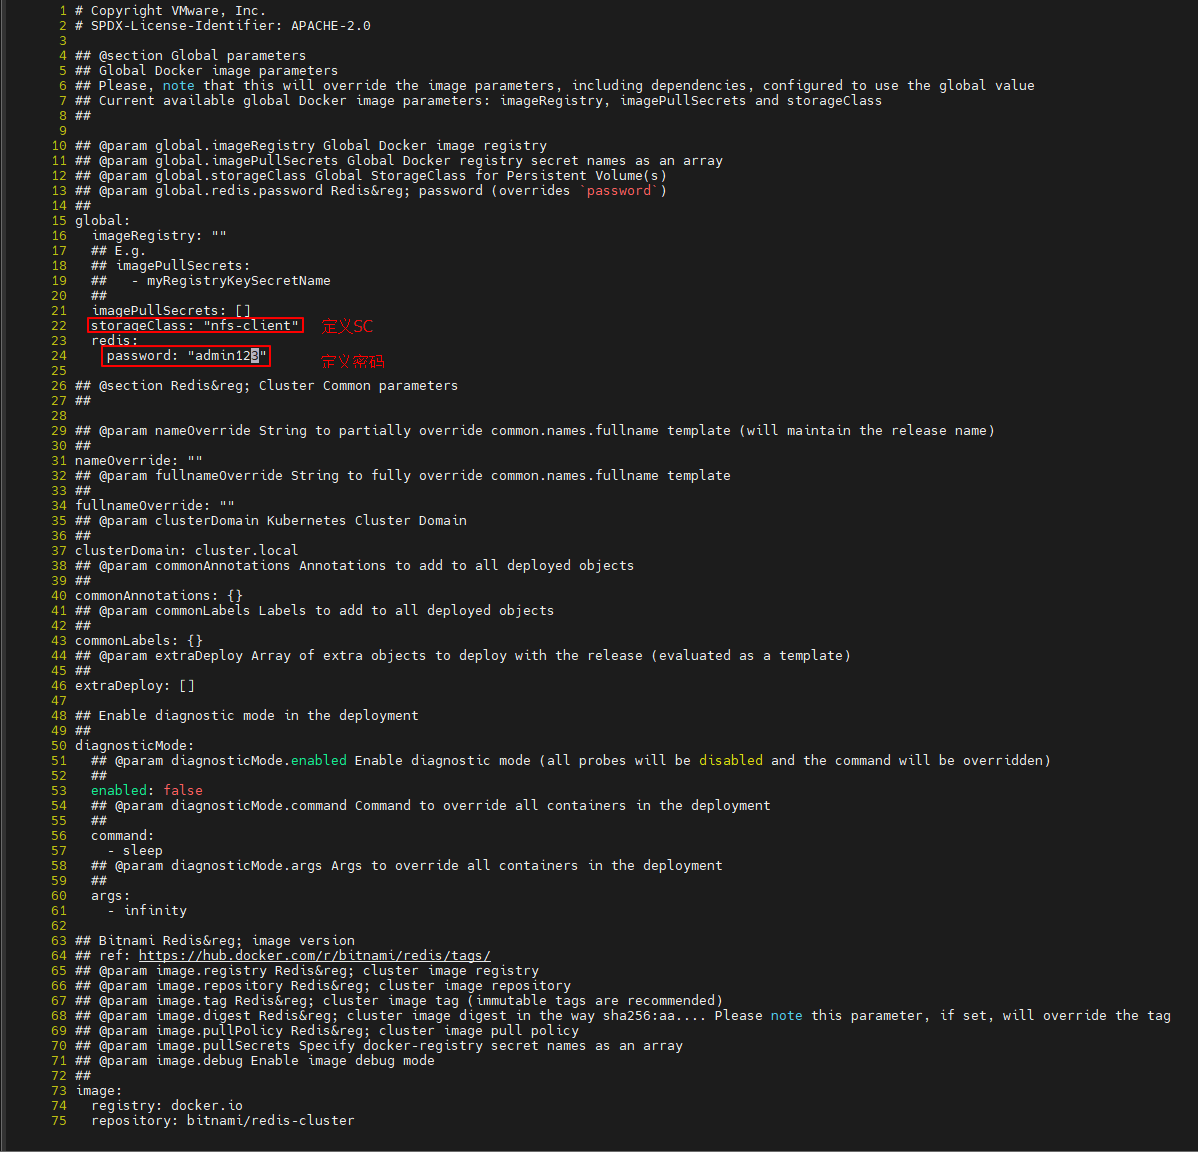 3、安装 ``` $ cd redis-cluster $ helm install redis-cluster . ``` 查看状态 ``` $ helm status redis-cluster NAME: redis-cluster LAST DEPLOYED: Sun Oct 22 21:14:21 2023 NAMESPACE: default STATUS: deployed REVISION: 1 TEST SUITE: None NOTES: CHART NAME: redis-cluster CHART VERSION: 9.0.13 APP VERSION: 7.2.2** Please be patient while the chart is being deployed ** To get your password run: export REDIS_PASSWORD=$(kubectl get secret --namespace "default" redis-cluster -o jsonpath="{.data.redis-password}" | base64 -d) You have deployed a Redis® Cluster accessible only from within you Kubernetes Cluster.INFO: The Job to create the cluster will be created.To connect to your Redis® cluster: 1. Run a Redis® pod that you can use as a client: kubectl run --namespace default redis-cluster-client --rm --tty -i --restart='Never' --env REDIS_PASSWORD=$REDIS_PASSWORD --image docker.io/bitnami/redis-cluster:7.2.2-debian-11-r0 -- bash 2. Connect using the Redis® CLI: redis-cli -c -h redis-cluster -a $REDIS_PASSWORD ``` 查看部署的 redis-cluster 集群 ``` $ helm list NAME NAMESPACE REVISION UPDATED STATUS CHART APP VERSION redis-cluster default 1 2023-10-22 21:14:21.745612154 +0800 CST deployed redis-cluster-9.0.13 7.2.2 $ kubectl get po NAME READY STATUS RESTARTS AGE redis-cluster-0 1/1 Running 0 3m6s redis-cluster-1 1/1 Running 2 (2m25s ago) 3m6s redis-cluster-2 1/1 Running 0 3m6s redis-cluster-3 1/1 Running 2 (2m34s ago) 3m6s redis-cluster-4 1/1 Running 2 (102s ago) 3m6s redis-cluster-5 1/1 Running 0 3m6s ``` 查看状态 ```Bash $ helm status redis-cluster NAME: redis-cluster LAST DEPLOYED: Sun Oct 22 21:14:21 2023 NAMESPACE: default STATUS: deployed REVISION: 1 TEST SUITE: None NOTES: CHART NAME: redis-cluster CHART VERSION: 9.0.13 APP VERSION: 7.2.2** Please be patient while the chart is being deployed ** To get your password run: export REDIS_PASSWORD=$(kubectl get secret --namespace "default" redis-cluster -o jsonpath="{.data.redis-password}" | base64 -d) You have deployed a Redis® Cluster accessible only from within you Kubernetes Cluster.INFO: The Job to create the cluster will be created.To connect to your Redis® cluster: 1. Run a Redis® pod that you can use as a client: kubectl run --namespace default redis-cluster-client --rm --tty -i --restart='Never' --env REDIS_PASSWORD=$REDIS_PASSWORD --image docker.io/bitnami/redis-cluster:7.2.2-debian-11-r0 -- bash 2. Connect using the Redis® CLI: redis-cli -c -h redis-cluster -a $REDIS_PASSWORD ``` 说明: - 默认 redis-cluster-0 和 redis-cluster-1 为主从,0主1从 - 默认 redis-cluster-2 和 redis-cluster-3 为主从,0主1从 - 默认 redis-cluster-4 和 redis-cluster-5 为主从,0主1从 4、连接 `Redis 集群` 验证服务 获取 Redis 集群的密码 ``` $ kubectl get secret --namespace "default" redis-cluster -o jsonpath="{.data.redis-password}" | base64 -d Huawei@123 ``` 将 Redis 的密码存到 linux 的环境变量 REDIS_PASSWORD 中 ``` $ export REDIS_PASSWORD=$(kubectl get secret --namespace "default" redis-cluster -o jsonpath="{.data.redis-password}" | base64 -d) ``` 启动一个临时容器 ``` $ kubectl run --namespace default redis-cluster-client --rm --tty -i --restart='Never' --env REDIS_PASSWORD=$REDIS_PASSWORD --image docker.io/bitnami/redis-cluster:7.2.1-debian-11-r0 -- bash ``` 登陆 Redis 集群 ``` $ redis-cli -c -h redis-cluster -a $REDIS_PASSWORD ``` 查看集群状态 ``` $ cluster info $ cluster nodes ``` 创建key和values,并进行查看 ``` $ set k1 'abc' $ get k1 $ keys * ``` ## 3.2 应用的升级和回滚 **升级** 1、安装好的应用,如果再次修改values.yaml(比如修改密码为admin12345),则需要做升级处理 ``` $ cd redis-cluster/ $ vi values.yaml ... ... storageClass: "nfs-client" redis: password: "admin12345" ... ... ``` 2、升级处理 ``` $ cd redis-cluster/ $ export REDIS_PASSWORD=$(kubectl get secret --namespace "default" redis-cluster -o jsonpath="{.data.redis-password}" | base64 -d) $ helm upgrade redis-cluster . --set password=$REDIS_PASSWORD $ kubectl get secret --namespace "default" redis-cluster -o jsonpath="{.data.redis-password}" | base64 -d admin12345 ``` 3、登录Redis集群进行验证,查看修改完密码后,数据是否丢失 ``` $ export REDIS_PASSWORD=$(kubectl get secret --namespace "default" redis-cluster -o jsonpath="{.data.redis-password}" | base64 -d) $ kubectl run --namespace default redis-cluster-client --rm --tty -i --restart='Never' --env REDIS_PASSWORD=$REDIS_PASSWORD --image docker.io/bitnami/redis-cluster:7.2.1-debian-11-r0 -- bash $ redis-cli -c -h redis-cluster -a $REDIS_PASSWORD $ keys * 1) "k1" ``` 4、查看升级记录 ``` $ helm history redis-cluster REVISION UPDATED STATUS CHART APP VERSION DESCRIPTION 1 Sat Oct 7 09:37:25 2023 superseded redis-cluster-9.0.7 7.2.1 Install complete 2 Sat Oct 7 10:00:00 2023 deployed redis-cluster-9.0.7 7.2.1 Upgrade complete ``` **回滚** 1、回滚指定版本 ``` $ helm rollback redis-cluster 1 ``` # 4、自定义chart-内置对象 ## 4.1 Helm chart包目录结构 创建自定义chart模板 ``` $ helm create my-template ``` 查看目录结构 ``` $ yum install -y tree $ tree my-template my-template ├── charts ├── Chart.yaml ├── templates │ ├── deployment.yaml │ ├── _helpers.tpl │ ├── hpa.yaml │ ├── ingress.yaml │ ├── NOTES.txt │ ├── serviceaccount.yaml │ ├── service.yaml │ └── tests │ └── test-connection.yaml └── values.yaml ``` 说明: - Chart.yaml:用于描述这个chart的基本信息,包括名字、描述信息、版本信息等。 - values.yaml:用于存储templates目录中模板文件中用到的变量信息,也就是说template中的模板文件引用的是values.yaml中的变量。 - templates:用于存放部署使用的yaml文件模板,这里面的yaml都是通过各种判断、流程控制、引用变量去调用values中设置的变量信息,最后完成部署。 - deployment.yaml:deployment资源yaml文件。 - ingress.yaml:ingress资源文件。 - NOTES.txt:用于接收chart的帮助信息,helm install部署完成后展示给用户,也可以时候helm status列出信息。 - _helpers.tpl:放置模板助手的地方,可以在整个chart中重复使用。 ## 4.2 helm chart模板 Helm最核心的就是模板,即模板化的K8s清单文件(如,deployment, service等),模板经过渲染后会被提交到K8s中,本质上就是Go语言的template模板,模板文件位于template/目录中。 将K8s清单文件中可能经常变动的字段,通过指定一个变量,在安装的过程中该变量将被值value动态替换掉,这个过程就是模板的渲染。 变量的值定义在values.yaml文件中,该文件中定义了变量的缺省值,但可以在helm install命令中配置新的值来覆盖缺省值。 **以下为模板内置对象** **Release对象** Release 对象描述了版本发布自身的一些信息。 | Release.Name | Release名字 | | ----------------- | ------------------------------------------ | | Release.Namespace | Release所在命名空间 | | Release.IsUpgrade | 如果当前操作是升级或回滚,则将其设置为true | | Release.IsInstall | 如果当前操作是安装,则设置为true | | Release.Revision | 此Release 的修订版本号 | | Release.Service | 渲染此模板的服务,一般都是“Helm” | **Values对象** Values 对象描述的是 values.yaml 文件中的内容,默认为空。使用 Value 对象可以获取到 values.yaml 文件中已定义的任何数值。 Values对象的值有4个来源: - chart包中的values.yaml文件; - 父chart包的values.yaml文件; - 通过helm install或者helm upgrade的-f 或者 –values参数传入的自定义的yaml文件(比如,helm install -f abc.yaml ) - 通过–set传递单个参数(比如,helm install –set image=nginx:1.23.2) 优先级:–set > -f > 父chart里的values.yaml > chart里的values.yaml | Value 键值对 | 获取方式 | | ----------------- | ---------------- | | name: aaron | Values.name | | info: name: aaron | Values.info.name | **Chart对象** Chart 对象用于获取 chart.yaml 文件中的内容 | Chart.Name | 获取Chart的名称 | | ----------------- | --------------------- | | Chart.Version | 获取Chart的版本 | | Chart.apiVersion | 获取Chart的API版本 | | Chart.description | 获取Chart的描述 | | Chart.type | 获取Chart的类型 | | Chart.keywords | 获取Chart的一组关键字 | **Capabilities对象** Capabilities 对象提供了关于 Kubernetes 集群相关的信息。 | Capabilities.APIVersions | 返回 Kubernetes 集群 API 版本信息集合 | | ------------------------------------- | ------------------------------------------------------------ | | Capabilities.APIVersions.Has $version | 用于检测指定的版本或资源在 Kubernetes 集群中是否可用,例如 batch/v1 或 apps/v1/Deployment | | Capabilities.KubeVersion | 用于获取 Kubernetes 的版本号 | | Capabilities.KubeVersion.Version | 用于获取 Kubernetes 的版本号 | | Capabilities.KubeVersion.Major | Kubernetes 的主版本号 | | Capabilities.KubeVersion.Minor | Kubernetes 的小版本号 | **Template对象** Template 对象用于获取当前模板的信息 | Template.Name | 用于获取当前模板的名称和路径(例如:mychart/templates/mytemplate.yaml) | | ----------------- | ------------------------------------------------------------ | | Template.BasePath | 用于获取当前模板的路径(例如:mychart/templates) | **Files对象** Files对象在chart中提供访问所有非特殊文件的对象。你不能使它访问template对象,只能访问其它文件。 | Files.Get | 通过文件名获取文件的方法 | | --------------- | ---------------------------------------------------------- | | Files.GetBytes | 用字节数组代替字符串获取文件内容的方法,常用于图片类的文件 | | Files.Glob | 用给定的shell glob模式匹配文件名返回文件列表的方法 | | Files.Lines | 逐行读取文件内容的方法 | | Files.AsSecrets | 使用Base64编码字符串返回文件体的方法 | | Files.AsConfig | 使用YAML格式返回文件体的方法 | # 5、Chart的values Values.yaml是Helm最重要的一个配置文件 首先,挪走自带的values.yaml ``` $ helm create my-template $ cd my-template $ mv values.yaml values.yaml.bak ``` 然后,写一个自定义的值 ``` $ cat > values.yaml <<EOF myname: aming EOF ``` 调用上面自定义变量的方法为: ``` {{ .Values.myname}} ``` 在configmap.yaml里调用 ``` $ cp -r templates/ templates.bak ##先备份一下template目录 $ rm -rf templates/* ##删除掉所有模板文件 $ cat > templates/configmap.yaml << EOF apiVersion: v1 kind: ConfigMap metadata: name: {{ .Release.Name }}-configmap data: myvalue: "Hello World" myname: {{ .Values.myname }} EOF ``` 查看渲染效果 ``` $ helm template testrelease . ## 当前目录是在测试的chart里面,假定release名字为testrelease ```  但是,这个myname值是会被–set参数覆盖的,例如: ``` $ helm template testrelease . --set myname=aminglinux ```  继续修改values.yaml内容 ``` $ cat > values.yaml <<EOF myname: aming service: type: ClusterIP port: 80 EOF ``` 要调用上面的type,需要引用{{ Vlues.service.type}} 定义service.yaml ``` $ cat > templates/service.yaml <<EOF apiVersion: v1 kind: Service metadata: name: testserivce labels: app: myapp spec: type: {{ .Values.service.type }} ports: - port: {{ .Values.service.port }} targetPort: http protocol: TCP name: http EOF ``` 查看渲染效果 ``` $ helm template testrelease . ``` 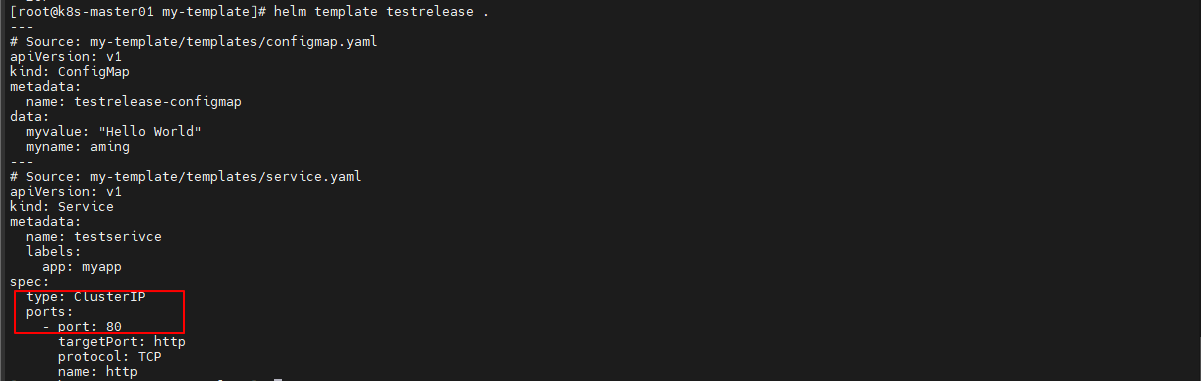 # 6、Chart模板里的函数 函数列表: https://helm.sh/zh/docs/chart_template_guide/function_list/ ## 6.1 quote函数 给对象加双引号,从而作为字符串使用 ``` $ cat > templates/configmap.yaml << EOF apiVersion: v1 kind: ConfigMap metadata: name: {{ .Release.Name }}-configmap data: myvalue: "Hello World" myname: {{ quote .Values.myname }} EOF ``` 渲染 ``` $ helm template testrelease . --- # Source: my-template/templates/configmap.yaml apiVersion: v1 kind: ConfigMap metadata: name: testrelease-configmap data: myvalue: "Hello World" myname: "aming" ``` ## 6.2 管道+upper函数 小写变大写 ``` $ cat > templates/service.yaml <<EOF apiVersion: v1 kind: Service metadata: name: testserivce labels: app: myapp spec: type: {{ .Values.service.type|upper|quote }} ports: - port: {{ .Values.service.port }} targetPort: http protocol: TCP name: http EOF ``` 渲染 ``` $ helm template testrelease . ```  ## 6.3 default函数 当对象值为空时,使用该函数定义的值 ``` $ cat > templates/service.yaml <<EOF apiVersion: v1 kind: Service metadata: name: testserivce labels: app: myapp spec: type: {{ .Values.service.type }} ports: - port: {{ .Values.service.port |default 8080 }} targetPort: http protocol: TCP name: http EOF ``` 渲染,观察到使用默认的8080 ``` $ helm template testrelease . --set service.port=null ``` 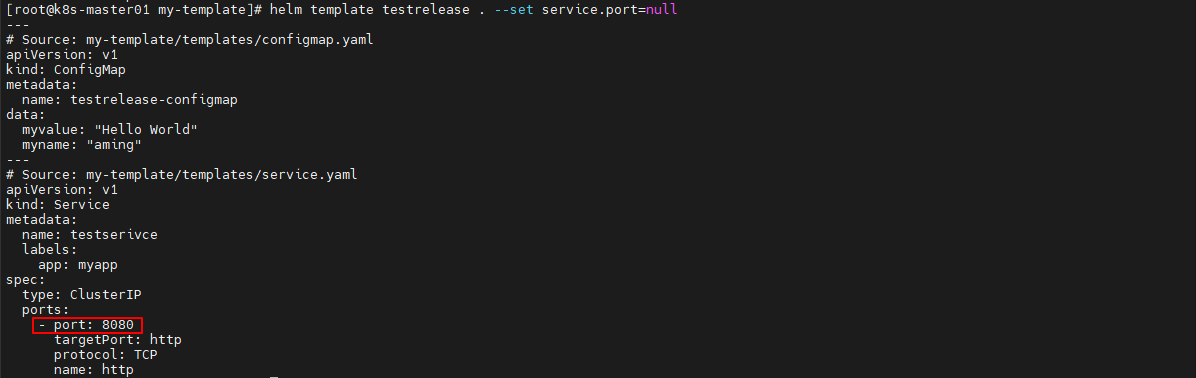 ## 6.4 indent函数 缩进,例如indent 4,表示缩进4个字符 ``` $ cat > templates/service.yaml <<EOF apiVersion: v1 kind: Service metadata: name: testserivce labels: app: myapp spec: type: {{ .Values.service.type|indent 8 }} ports: - port: {{ .Values.service.port }} targetPort: http protocol: TCP name: http EOF ``` 渲染 ``` $ helm template testrelease . ``` 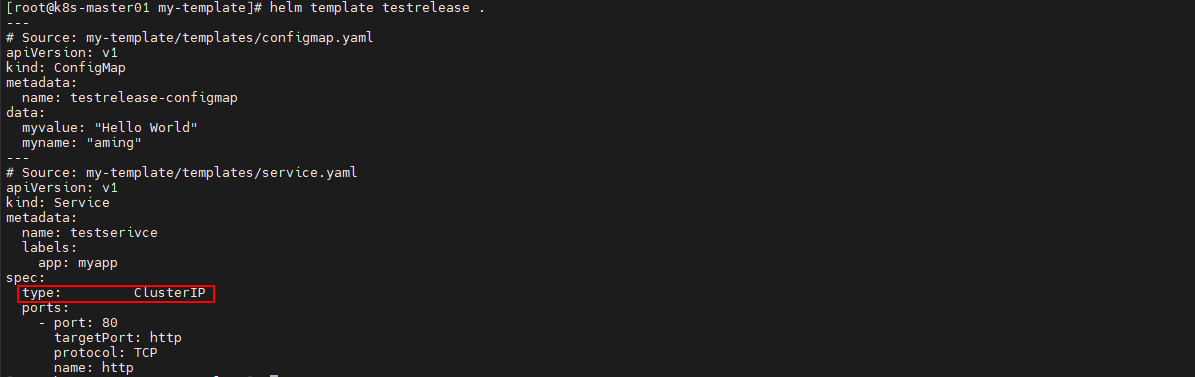 ## 6.5 nindent函数 换行并缩进 ``` $ cat > templates/service.yaml <<EOF apiVersion: v1 kind: Service metadata: name: testserivce labels: app: myapp spec: type: {{ .Values.service.type|nindent 8 }} ports: - port: {{ .Values.service.port }} targetPort: http protocol: TCP name: http EOF ``` 渲染 ``` $ helm template testrelease . ``` 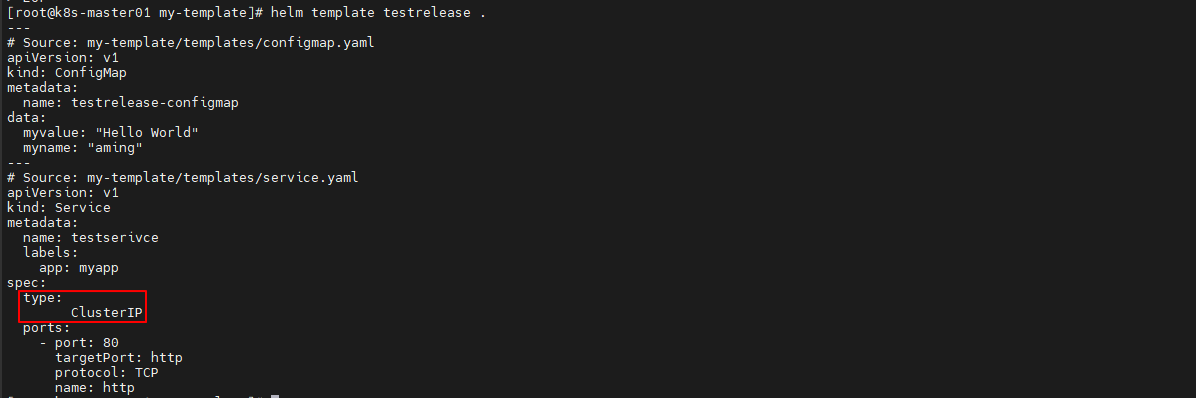 #7、Chart模板流程控制if_with_range ## 7.1 if 1、修改values.yaml ``` $ cat > values.yaml <<EOF myname: aming service: type: ClusterIP port: 80 myport: 8080 EOF ``` 2、修改service.yaml ``` $ cat > templates/service.yaml <<EOF apiVersion: v1 kind: Service metadata: name: testserivce labels: app: myapp spec: type: {{ .Values.service.type }} ports: {{- if eq .Values.web "nginx" }} - port: {{ .Values.service.port }} {{- else }} - port: {{ .Values.service.myport }} {{- end }} targetPort: http protocol: TCP name: http EOF ``` **说明:在if else end 左边加-,是为了去掉空行。{{- 表示删除左边的所有空格,直到非空格字符,而 -}}表示删除右边的所有空格。注意,换行符也是空格,当然还包括空格,TAB字符** | 函数 | 解释 | 示例 | | ---- | ------------------------------------------------------------ | -------------- | | eq | 返回参数的布尔等式(比如, Arg1 == Arg2)。 | eq .Arg1 .Arg2 | | ne | 返回参数的布尔非等式(比如 Arg1 != Arg2)。 | ne .Arg1 .Arg2 | | lt | 如果第一参数小于第二参数,返回布尔真。否则返回假(比如, Arg1 < Arg2)。 | lt .Arg1 .Arg2 | | le | 如果第一参数小于等于第二参数,返回布尔真,否则返回假(比如, Arg1 <= Arg2)。 | le .Arg1 .Arg2 | | gt | 如果第一参数大于第二参数,返回布尔真,否则返回假(比如, Arg1 > Arg2)。 | gt .Arg1 .Arg2 | | ge | 如果第一参数大于等于第二参数,返回布尔真,否则返回假。(比如, Arg1 >= Arg2) | ge .Arg1 .Arg2 | 3、渲染 ``` $ cd my-template $ helm template testrelease . --set web=nginx ``` 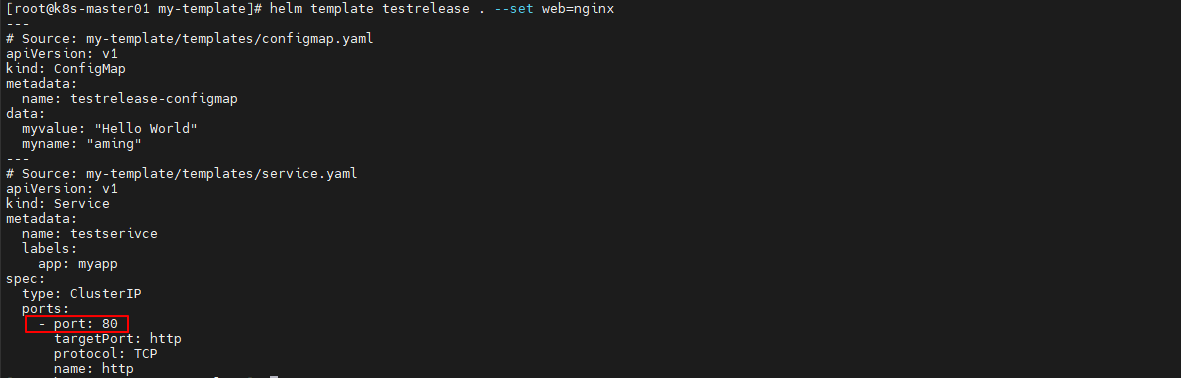 如果不定义web变量的值,port为8080 ``` $ helm template testrelease . ``` 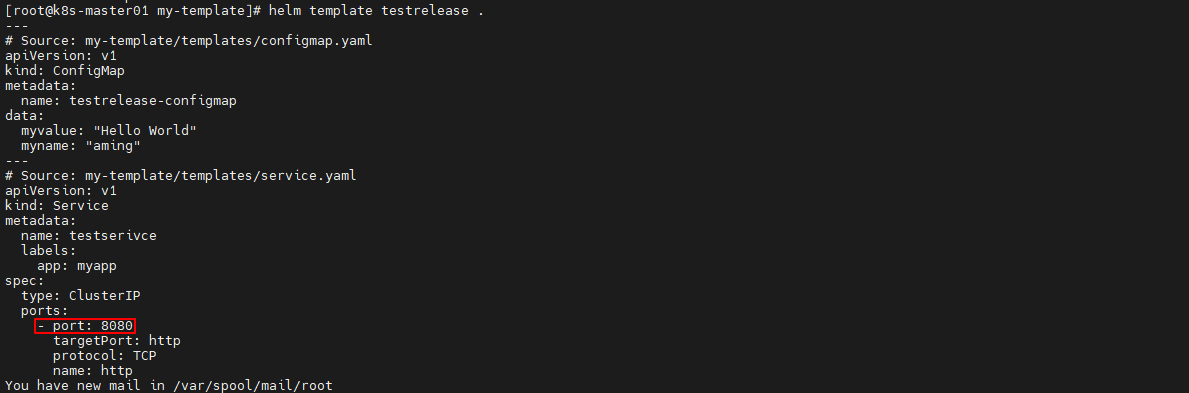 ## 7.2 with 限定作用域 with 的语法类似简单的 if: ``` {{ with PIPELINE }} # restricted scope {{ end }} ``` **没有用 with 的例子** ``` $ cat >> values.yaml <<EOF env: host: localhost user: test hello: world EOF ``` deployment.yaml 的引用: ``` $ cat >> templates/deployment.yaml <<EOF {{- if .Values.env }} env: - name: host value: {{ .Values.env.host }} - name: user value: {{ .Values.env.user }} - name: hello value: {{ .Values.env.hello }} {{- end }} EOF ``` 上面的变量引用都需要从.Values开始,都需要重复输入.Values.env, 有点繁琐。 下面使用`with`简化上面步骤 deployment.yaml 添加 with 以后 ``` cat > templates/deployment.yaml <<EOF {{- with .Values.env }} env: - name: host value: {{ .host }} - name: user value: {{ .user }} - name: hello value: {{ .hello }} {{- end }} EOF ``` with 语句块里, 把当前范围定义在了.Values.env这个变量上了。 渲染后结果: ``` env: - name: host value: localhost - name: user value: test - name: hello value: world ``` ## 7.3 range 实现循环 在values.yaml 文件中添加上一个变量列表: ``` $ cat > values.yaml <<EOF myname: aming service: type: ClusterIP port: 80 myport: 8080 test: - 1 - 2 - 3 EOF ``` 循环打印该列表: ``` $ cat > templates/configmap.yaml <<EOF apiVersion: v1 kind: ConfigMap metadata: name: {{ .Release.Name }}-configmap data: myvalue: "Hello World" myname: {{ quote .Values.myname }} test: | {{- range .Values.test }} - {{ . }} ##遍历循环打印所有元素 {{- end }} EOF ``` 渲染 ``` $ helm template testrelease . ``` 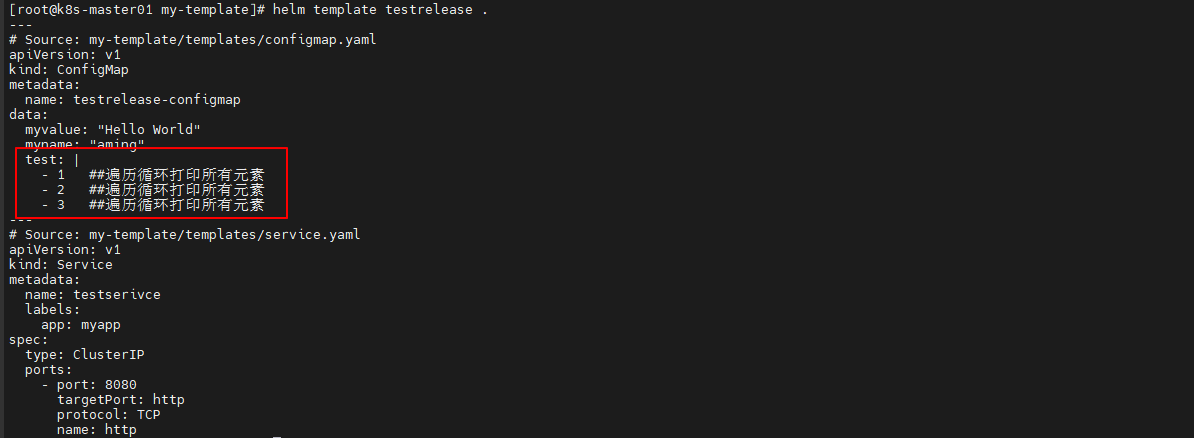 # 8、Chart模板中的变量 变量在模板中,使用变量的场合不多,但个别情况下不得不使用变量。 **问题1:获取数组键值** 在 range 循环中使用 $k 和 $v 两个变量来接收后面列表循环的键和值 values.yaml ``` cat > values.yaml <<EOF env: NAME: "gateway" JAVA_OPTS: "-Xmx1G" EOF ``` deployment.yaml ``` $ rm -f templates/* cat > templates/deployment.yaml <<EOF env: {{- range $k, $v := .Values.env }} - name: {{ $k }} value: {{ $v | quote }} {{- end }} EOF ``` 结果如下 ``` $ helm template testrelease . # Source: my-template/templates/deployment.yaml env: - name: JAVA_OPTS value: "-Xmx1G" - name: NAME value: "gateway" ``` **问题2:with 中不能使用内置对象** deployment.yaml ``` apiVersion: apps/v1 kind: Deployment metadata: name: {{ .Release.Name }}-deployment spec: replicas: {{ .Values.replicas }} template: metadata: labels: project: {{ .Values.label.project }} app: {{ quote .Values.label.app }} {{- with .Values.label }} project: {{ .project }} app: {{ .app }} release: {{ .Release.Name }} {{- end }} ``` with 语句块内不能带 .Release.Name 对象,否则发生如上报错。我们可以将该对象赋值给一个变量可以来解决这个问题: ``` {{- $releaseName := .Release.Name -}} {{- with .Values.label }} project: {{ .project }} app: {{ .app }} release: {{ $releaseName }} ``` 重新整理 ``` apiVersion: apps/v1 kind: Deployment metadata: name: {{ .Release.Name }}-deployment spec: replicas: {{ .Values.replicas }} template: metadata: labels: project: {{ .Values.label.project }} app: {{ quote .Values.label.app }} {{- $releaseName := .Release.Name -}} {{- with .Values.label }} project: {{ .project }} app: {{ .app }} release: {{ $releaseName }} {{- end }}0 ``` 可以看到在with 语句上面增加了一句 {{- $releaseName:=.Release.Name- }},其中$releaseName 就是后面的对象的一个引用变量,它的形式就是 *name*,*赋值操作使用* := ,*这样with语句块内部的*releaseName 变量仍然指向的是.Release.Name # 9、Chart的命名模板 命名模板有时候也被称为部分或子模板。 相对于 deployment.yaml 这种主模板,命名模板只是定义部分通用内容,然后在各个主模板中调用。 templates目录下有个_helpers.tpl文件。公共的命名模板都放在这个文件里。 ## 9.1 define用法 定义一个只包含字符串的模板,用作资源名称 ``` $ helm create my-template $ cd my-template $ cat > templates/_helpers.tpl <<EOF {{/* 定义资源名称 */}} {{ define "mytest.name" -}} aminglinux {{- end }} EOF ``` 使用template引用 ``` $ cat > templates/test.yaml <<EOF apiVersion: apps/v1 kind: Deployment metadata: name: {{ template "mytest.name" }} labels: app: {{ .Values.myname }} EOF ``` 定义values.yaml ``` $ cat > values.yaml <<EOF myname: aming service: type: ClusterIP port: 80 myport: 8080 test: - 1 - 2 - 3 EOF ``` 渲染 ``` $ helm template testrelease . ```  ## 9.2 include用法 创建了一个名为`_helpers.tpl`的Helm模板文件,其中定义了两个`define`块:一个用于定义资源的名称,另一个用于定义标签。 ``` $ cat > templates/_helpers.tpl <<EOF {{/* 定义资源名称 */}} {{ define "mytest.name" -}} aminglinux {{- end }} {{/* 定义label */}} {{- define "mytest.label" -}} app: {{ .Release.Name }} release: stable env: qa {{- end }} EOF ``` 在template的yaml文件里调用 ``` $ cat > templates/test.yaml <<EOF apiVersion: apps/v1 kind: Deployment metadata: name: test-{{ template "mytest.name" . }} labels: {{- include "mytest.label" . | nindent 4 }} EOF ``` 定义values.yaml ``` $ cat > values.yaml <<EOF myname: aming service: type: ClusterIP port: 80 myport: 8080 test: - 1 - 2 - 3 EOF ``` 渲染 ``` $ helm template testrelease . ```  # 10、自定义Chart实战 )创建chart包 ``` $ helm create aminglinux ``` 2)自定义templates模板文件 删除掉默认的模板文件 ``` $ cd aminglinux $ rm -rf templates/* ``` 生成一个deployment模板 ``` $ kubectl create deployment aminglinux --image=nginx:1.21.6 -o yaml --dry-run=client > templates/deployment.yaml ``` 修改deployment.yaml ``` $ cd aminglinux $ vi templates/deployment.yaml #改成如下内容 apiVersion: apps/v1 kind: Deployment metadata: labels: app: {{ .Values.appname }} #将values.yaml中的appname对应的变量值渲染在这里 name: aminglinux spec: replicas: {{ .Values.replicas }} #将values.yaml中的replicas对应的变量值渲染在这里 selector: matchLabels: app: {{ .Values.appname }} #标签可以和资源名称一样,因此也可以直接调用appname变量 template: metadata: labels: app: {{ .Values.appname }} #标签可以和资源名称一样,因此也可以直接调用appname变量 spec: containers: - image: {{ .Values.image }}:{{ .Values.imageTag }} #将values.yaml中的image、imageTag对应的变量值渲染在这里,表示镜像的版本号 name: {{ .Values.appname }} #容器的名称也和资源的名称保持一致即可 command: [ "/bin/sh","-c","/data/init.sh" ] ports: - name: web containerPort: 80 protocol: TCP volumeMounts: - name: code mountPath: /data/code/aminglinux - name: config mountPath: /data/nginx/conf/conf.d/ volumes: - name: config configMap: name: {{ .Values.appname }}-cm #confimap的名字也可以使用程序名称的变量加上-cm - name : code persistentVolumeClaim: claimName: {{ .Values.appname }}-pvc #pvc的名字也可以使用程序名称的变量加上-pvc readOnly: false ``` 编辑svc模板 ``` $ vi templates/service.yaml ##写入如下内容 apiVersion: v1 kind: Service metadata: labels: app: {{ .Values.appname }} #service要管理deployment的pod资源,因此这里的标签要和pod资源的标签对应上,直接调用appname这个变量 name: {{ .Values.appname }}-svc #service资源的名称,也可以直接调用appname这个变量,后面加一个-svc spec: ports: - port: 80 protocol: TCP targetPort: 80 selector: app: {{ .Values.appname }} #标签选择器还是调用appname这个变量 type: NodePort ``` 编辑configmap模板 ``` $ vi templates/configmap.yaml ##写入如下内容 apiVersion: v1 kind: ConfigMap metadata: name: {{ .Values.appname }}-cm #引入appname变量加上-cm作为cm资源的名称 data: test.aminglinux.com.conf: | server { listen 80; server_name test.aminglinux.com; location / { root /data/code/aminglinux; index index.html; } } ``` 编辑pv/pvc模板 ``` $ vi templates/pv-pvc.yaml #内容如下 apiVersion: v1 kind: PersistentVolume metadata: name: {{ .Values.appname }}-pv #引入appname变量加上-pv作为pv资源的名称 labels: pv: {{ .Values.appname }}-pv #标签也可以使用和pv名称一样的名字 spec: capacity: storage: 2Gi accessModes: - ReadWriteMany persistentVolumeReclaimPolicy: Retain nfs: path: {{ .Values.nfsPath }} #这里会引入nfsPath变量的值 server: {{ .Values.nfsServer }} #这里会引入nfsServer变量的值 --- apiVersion: v1 kind: PersistentVolumeClaim metadata: name: {{ .Values.appname }}-pvc #引入appname变量加上-pvc作为pvc资源的名称 spec: accessModes: - ReadWriteMany resources: requests: storage: 2Gi selector: matchLabels: pv: {{ .Values.appname }}-pv #指定pv的标签 ``` 定义values.yaml ``` $ vi values.yaml #内容如下 appname: aminglinux replicas: 2 image: aminglinux/helm-custom-chart ##这是一个测试的镜像 imageTag: v0 nfsPath: /data/nfs/aminglinux ##这个目录需要提前创建好 nfsServer: 192.168.1.34 ``` 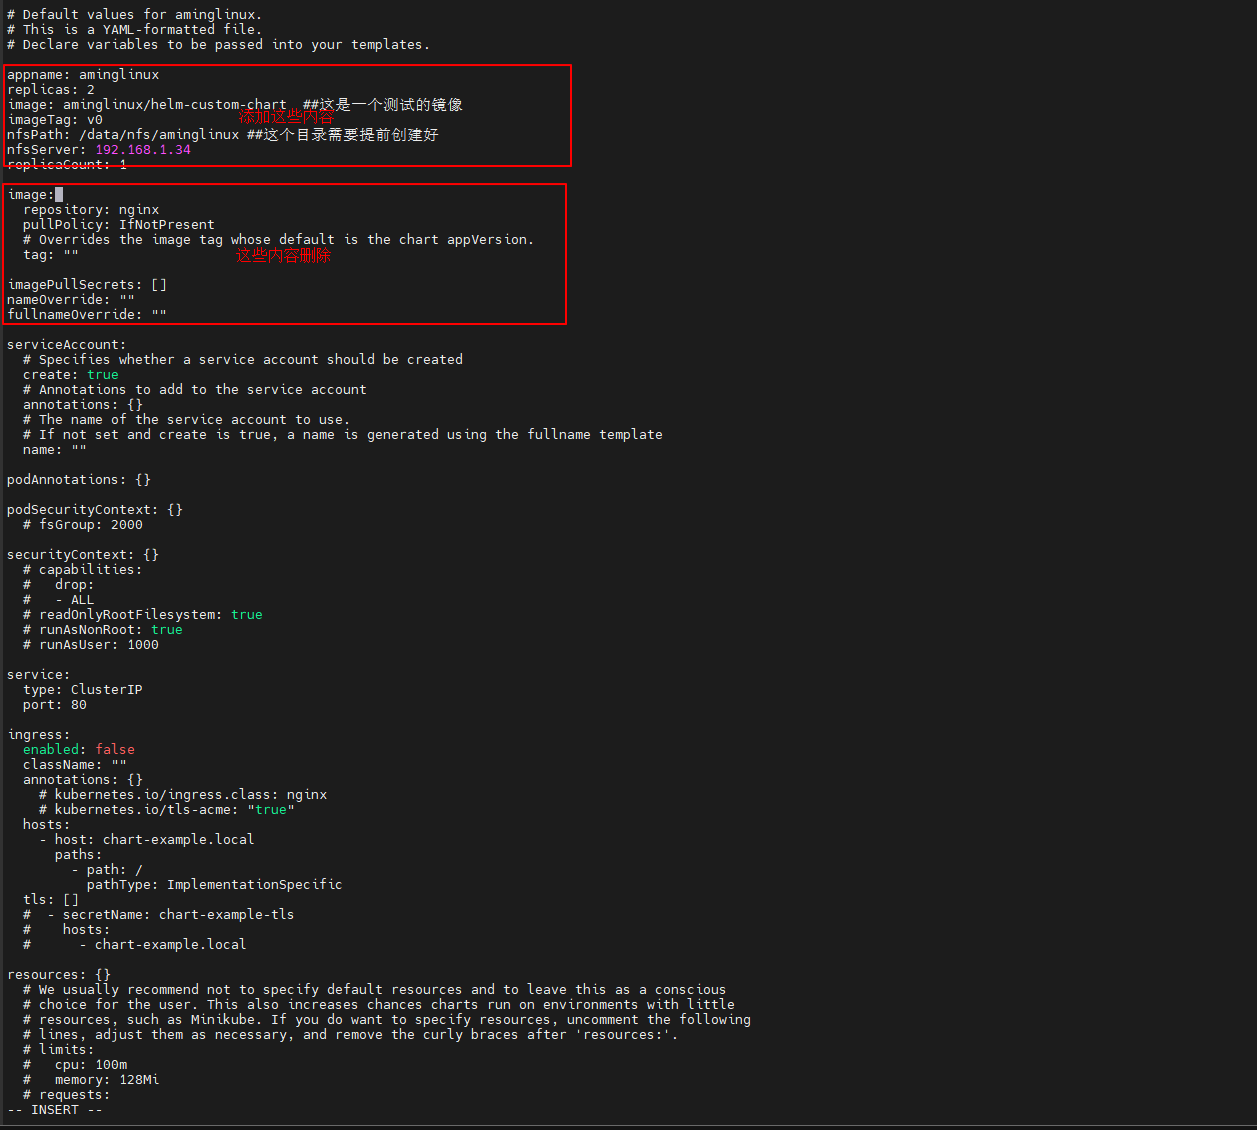 3)参考10.3 NFS存储安装nfs机器,并创建/data/nfs/aminglinux目录 ``` $ mkdir -p /data/nfs/aminglinux ``` 4)安装chart ``` $ helm install aminglinux-release . ``` 5)查看svc ``` $ kubectl get svc NAME TYPE CLUSTER-IP EXTERNAL-IP PORT(S) AGE aminglinux-svc NodePort 10.0.38.79 <none> 80:31047/TCP 23m ``` 查看pv ``` $ kubectl get pv NAME CAPACITY ACCESS MODES RECLAIM POLICY STATUS CLAIM STORAGECLASS REASON AGE aminglinux-pv 2Gi RWX Retain Bound default/aminglinux-pvc 77s ``` 查看pvc ``` $ kubectl get pvc NAME STATUS VOLUME CAPACITY ACCESS MODES STORAGECLASS AGE aminglinux-pvc Bound aminglinux-pv 2Gi RWX 23s ``` 6)到NFS服务器上创建一个测试页 ``` $ echo "This is a test site." > /data/nfs/aminglinux/index.html ``` 7)等pod起来后进行测试 ``` $ curl 10.0.38.79 This is a test site. ``` 8)恢复 ``` $ helm uninstall aminglinux-release ``` # 11、使用Helm安装harbor 1、下载harbor的chart包 Harbor的chartmuseum可以让Helm直接将chart包推送到harbor里,但是注意,harbor从2.8.0开始已经不支持chartmuseum了(目前最新版是2.9.0),而是改为了OCI ,鉴于新版本不太成熟和使用人太少,所以当前,我们安装2.6.2版本 (a)查看历史版本 ``` $ helm search repo harbor -l ``` (b)下载chart包,16.1.0是chart的版本,而harbor版本为2.6.2 ``` $ helm pull bitnami/harbor --version 16.1.0 --untar ``` 2、参考8.4 API资源对象StorageClass安装SC ``` $ kubectl get sc NAME PROVISIONER RECLAIMPOLICY VOLUMEBINDINGMODE ALLOWVOLUMEEXPANSION AGE nfs-client k8s-sigs.io/nfs-subdir-external-provisioner Delete Immediate false 8h ``` 3、修改默认values.yaml ``` $ cd harbor $ vi values.yaml ``` 定义storageClass为nfs-client 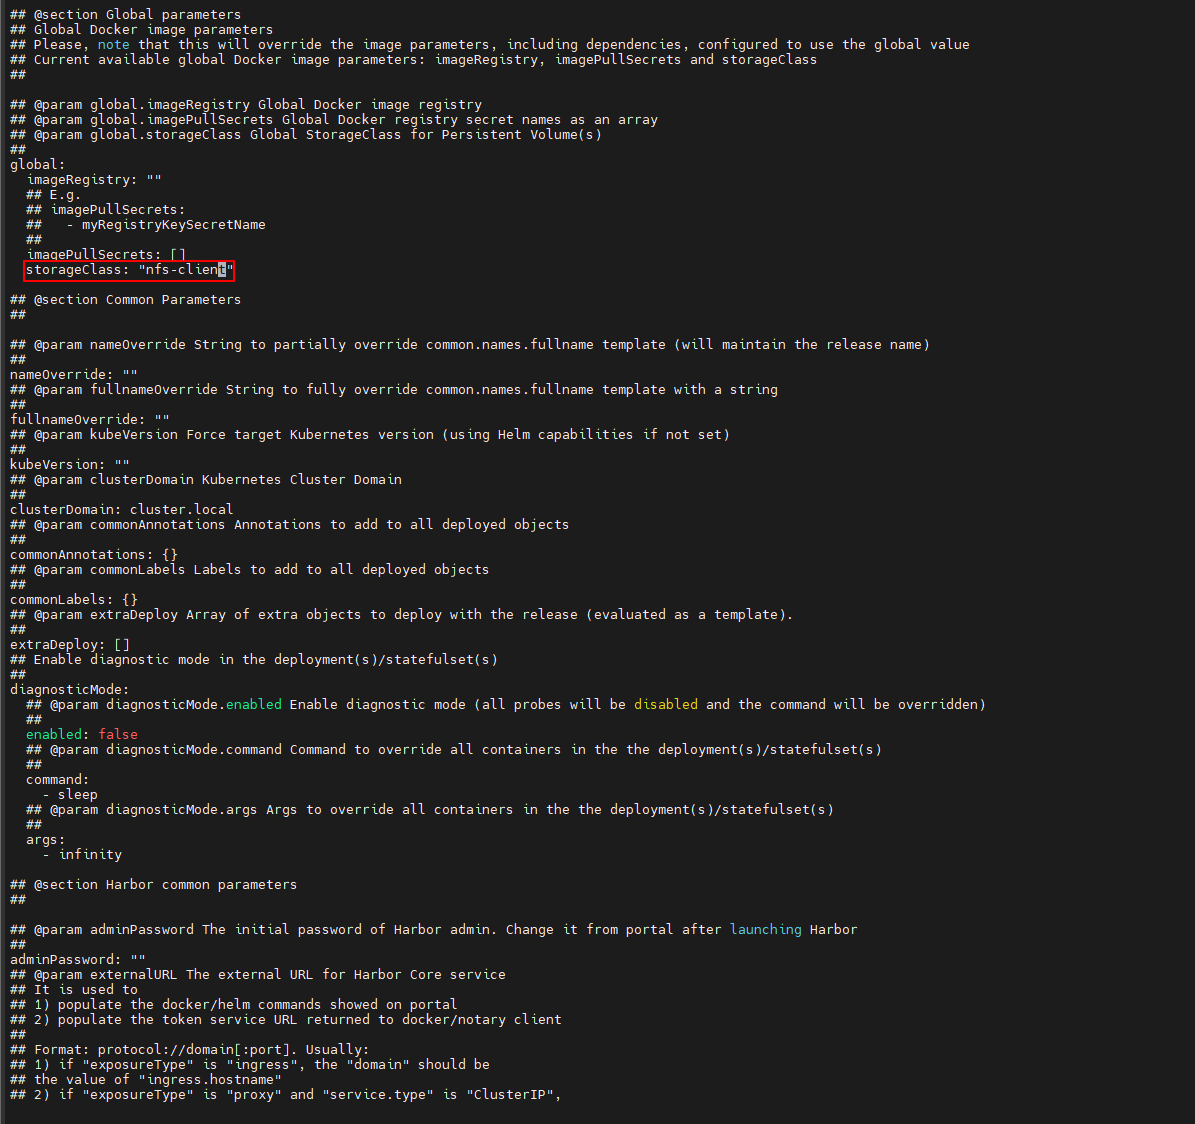 将所有“core.harbor.domain”替换为你自己的域名,这里为harbor.zhoumx.cc ``` :%s/core.harbor.domain/harbor.zhoumx.cc/g ``` 说明:上面在vi模式应用 4、安装 ``` $ cd harbor $ helm install myharbor --version 16.1.0 . ``` 5、查看端口,443端口对应的是31630 ``` $ kubectl get svc |grep harbor |grep LoadBalancer myharbor LoadBalancer 10.0.104.28 <pending> 80:32256/TCP,443:31630/TCP,4443:32241/TCP 11s ``` 在k8s-master01节点上添加hosts解析 ``` $ vi /etc/hosts ... ... 10.0.104.28 harbor.zhoumx.cc ``` 6、查看密码 ``` $ kubectl get secret --namespace default myharbor-core-envvars -o jsonpath="{.data.HARBOR_ADMIN_PASSWORD}" | base64 -d XnCegrM9Ju ``` 7、查看pod是否正常启动 ``` $ kubectl get po | grep myharbor myharbor-chartmuseum-5c4c98dc9f-xp4vz 1/1 Running 0 94m myharbor-core-67f4fd7586-mtfdc 1/1 Running 7 (76m ago) 94m myharbor-jobservice-6c7d9479b5-bq9cw 1/1 Running 6 (73m ago) 94m myharbor-nginx-56db455867-kdnsz 1/1 Running 7 (78m ago) 94m myharbor-notary-server-dcf4d97c8-rxxzb 1/1 Running 1 (78m ago) 94m myharbor-notary-signer-cbd5bc48f-jblv4 1/1 Running 0 94m myharbor-portal-65747b4f54-qlqh5 1/1 Running 0 94m myharbor-postgresql-0 1/1 Running 0 94m myharbor-redis-master-0 1/1 Running 0 94m myharbor-registry-756b4847d7-w98s5 2/2 Running 0 94m myharbor-trivy-0 1/1 Running 0 94m ``` 8、浏览器输入harbor.zhoumx.cc:31630登录,账号:admin,密码:XnCegrM9Ju 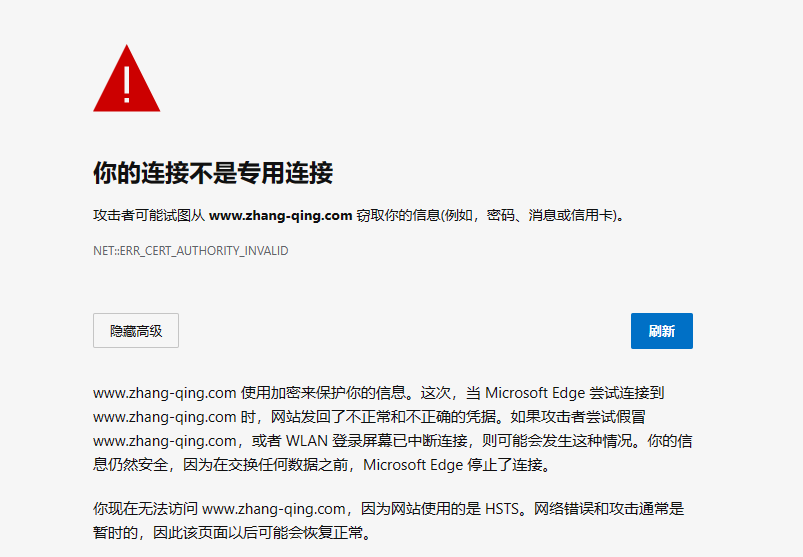 如果出现上面情况,调整键盘为英文输入状态,点击页面内的刷新按钮,刷新一下页面,然后用鼠标点击一下当前页面任意位置,紧接着在当前页面使用键盘直接输入:`thisisunsafe`即可 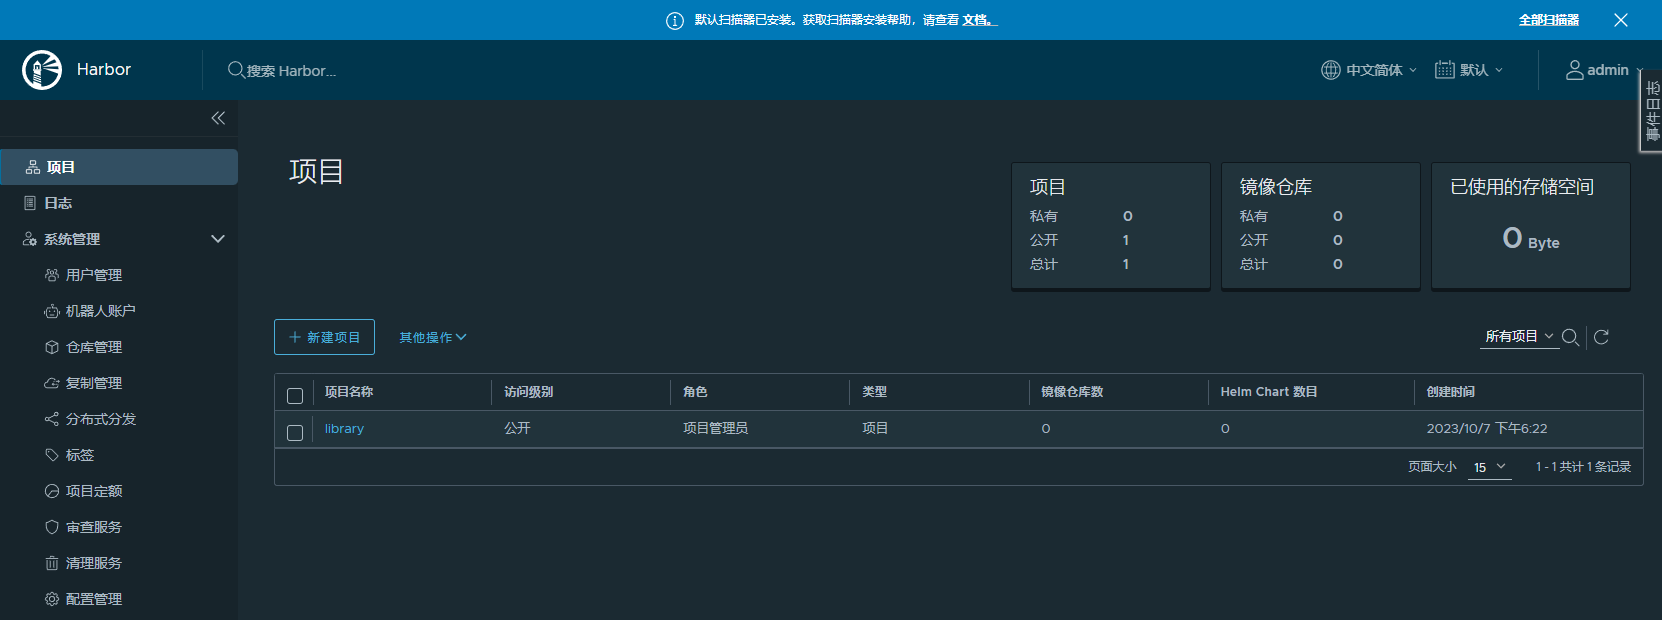 # 12、将Chart推送到私有仓库harbor 1、安装helm-push插件 ``` $ helm plugin install https://github.com/chartmuseum/helm-push --version v0.10.1 ``` 检查plugins列表 ``` $ helm plugin list NAME VERSION DESCRIPTION cm-push 0.10.1 Push chart package to ChartMuseu ``` 2、添加harbor地址 (1)到harbor浏览器后台,添加新的项目 【chart_repo】 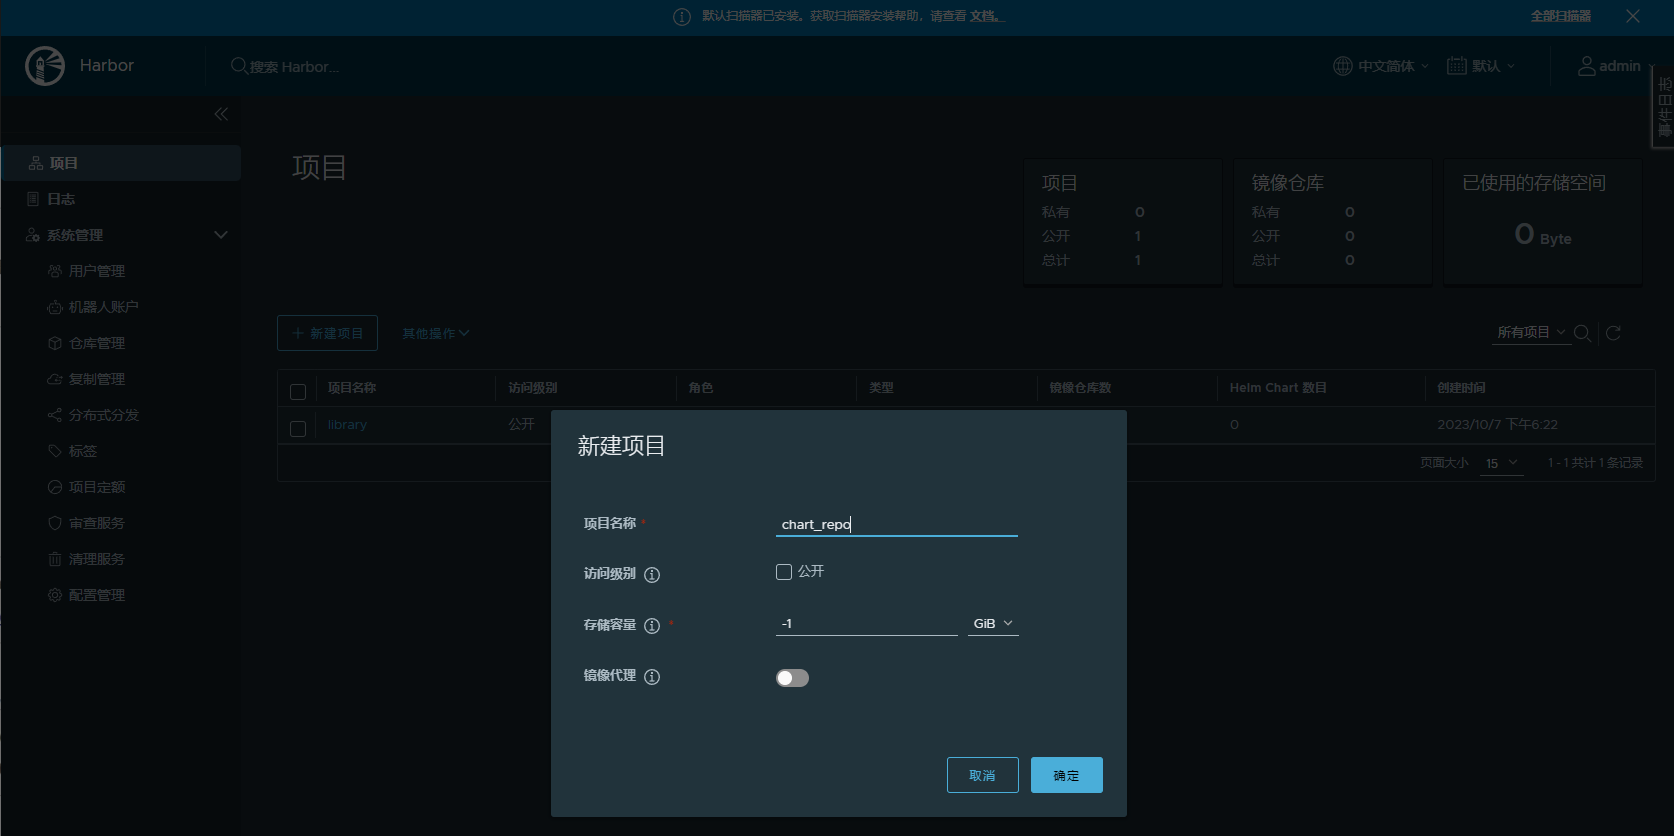 (2)helm添加新仓库 ``` $ helm repo add myharbor https://harbor.zhoumx.cc/chartrepo/chart_repo --username=admin --password=XnCegrM9Ju ``` 如果不知道密码 ``` $ kubectl get secret --namespace default myharbor-core-envvars -o jsonpath="{.data.HARBOR_ADMIN_PASSWORD}" | base64 -d XnCegrM9Ju ``` 如果出现x509的错误提示,执行 ``` $ echo -n | openssl s_client -showcerts -connect harbor.zhoumx.cc:443 2>/dev/null | sed -ne '/-BEGIN CERTIFICATE-/,/-END CERTIFICATE-/p' >> /etc/ssl/certs/ca-bundle.trust.crt ``` 验证查看 ``` $ helm repo list NAME URL bitnami https://charts.bitnami.com/bitnami aliyun https://kubernetes.oss-cn-hangzhou.aliyuncs.com/charts helm_sh https://charts.helm.sh/stable myharbor https://harbor.zhoumx.cc/chartrepo/chart_repo ``` 更新仓库到本地 ``` $ $ helm repo update ``` 3、推送自定义chart ``` $ cd /root/ $ helm cm-push aminglinux/ myharbor ``` **说明:aminglinux是在12.10自定义Chart实战创建的** 4、查看 ``` $ helm repo update $ helm search repo aminglinux ``` 5、更新自定义chart 更改Chart版本号为0.1.1,app版本为1.16.1 ``` $ cd /root/aminglinux $ vi Chart.yaml ##更改版本号 ``` 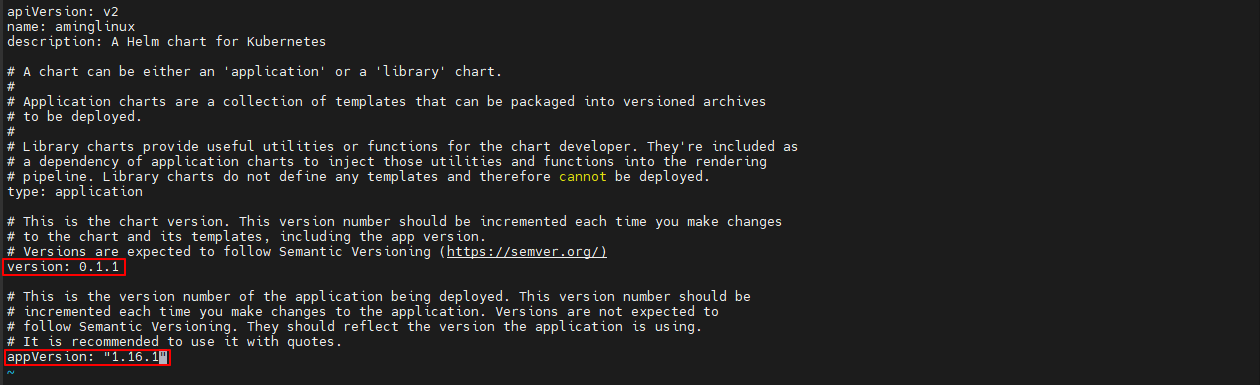 更改replicas为1 ``` $ cd /root/aminglinux $ vi values.yaml ``` 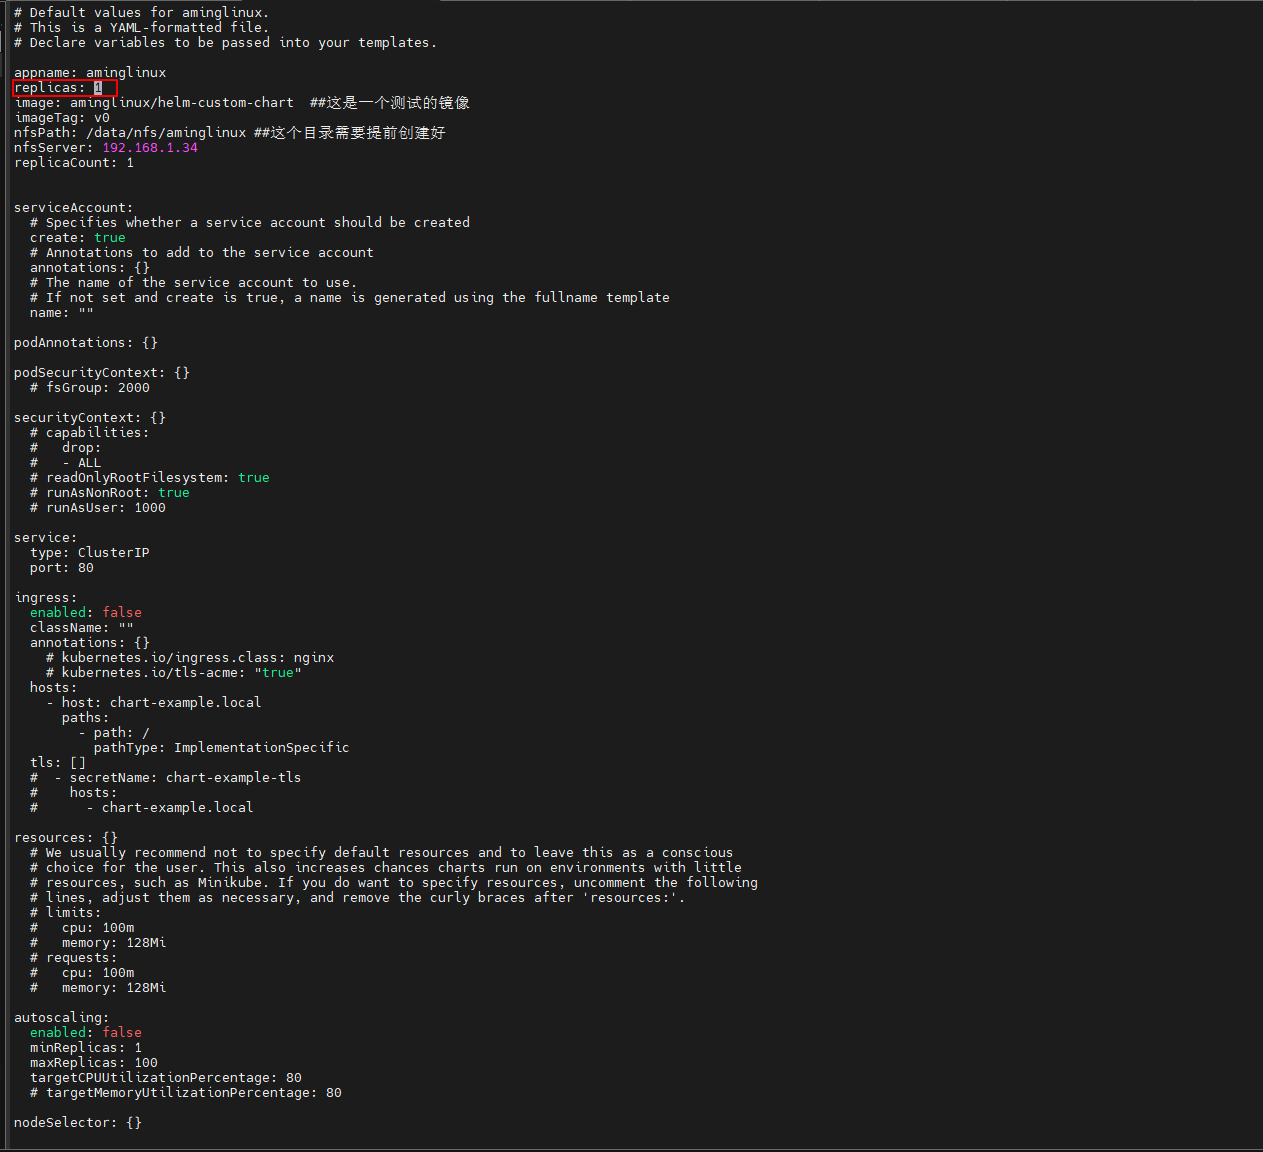 升级本地release ``` $ cd /root/aminglinux $ helm upgrade aminglinux-release . ``` 6、推送到私有仓库 ``` $ cd .. $ helm cm-push aminglinux/ myharbor ``` 7、 利用远程仓库安装新release (1)更新本地仓库 ``` $ helm repo update ``` (2)删除之前的release,得等一会儿,等到pvc删除 ``` $ cd aminglinux $ helm uninstall aminglinux-release ``` (3)安装远程仓库 ``` $ helm install aminglinux-2 myharbor/aminglinux ``` 8、恢复 ``` $ helm uninstall aminglinux-2 ```
阿星
2024年1月6日 15:54
转发文档
收藏文档
上一篇
下一篇
手机扫码
复制链接
手机扫一扫转发分享
复制链接
📢 网站已迁移:
本站内容已迁移至新地址:
zhoumx.net
。
注意:
本网站将不再更新,请尽快访问新站点。
Markdown文件
PDF文档(打印)
分享
链接
类型
密码
更新密码